

Buttons, Icons, and Symbols in Mentor EDC
There are various ways to navigate to and access features within the Sitero EDC.
Action Buttons, Symbols, Status Icons
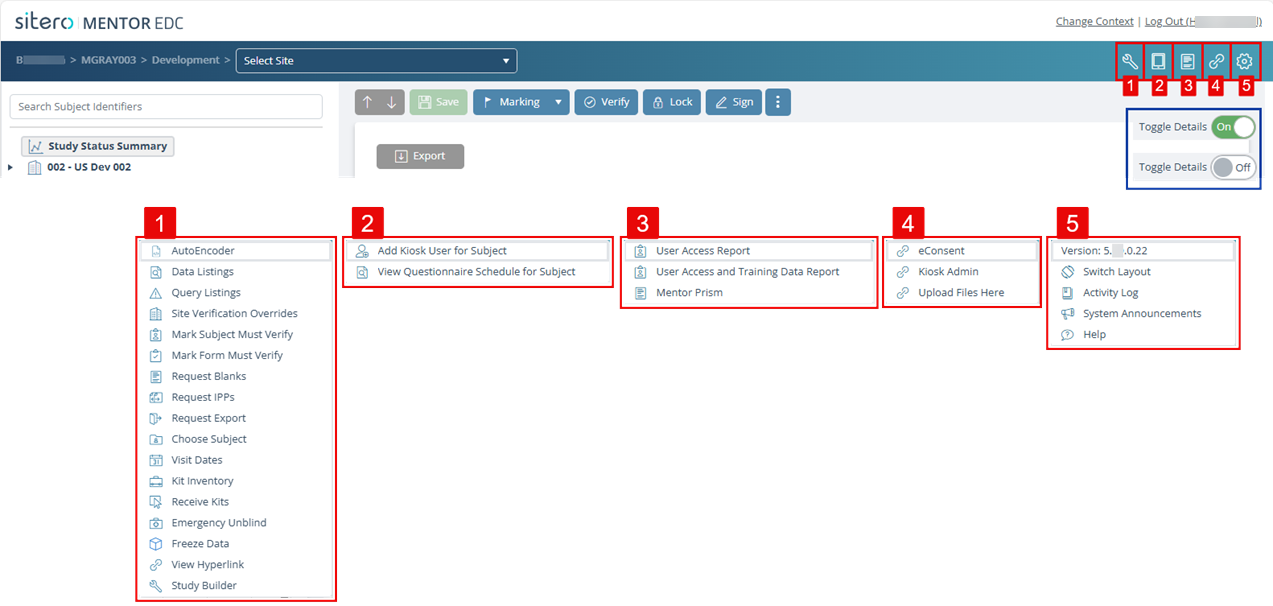
The Action Bar at the top of the screen allows you to access features, functions, and views in the system.
The Action Bar displays options that are available within the screen you access.
Depending on the study protocol and your permissions, your toolbar may display different than the figure below.
Use the buttons to perform actions and navigate to previous and next entries in a folder.
Additional buttons may display after selecting a form or folder in the tree; the figure below shows many (but not all) button options in this system.

The table below provides description information for most buttons that are available.
Remember button names in this system may be customized to identify the process being performed when the button is used. Button color may give an indication of the effect on the record, e.g., red = stop or pause, blue = add or edit.
*IMPORTANT INFORMATION: Based on the browser in use, some shortcut keys may be superseded by the browser. An asterisk (*) displays in the Shortcut Key column of the table below when applicable; use the EDC button instead of the shortcut option to access the function.
| Button or Option | Function | Shortcut | Description |
 |
Promote [to Current] | – – | Use to update Form status Promote [selected version of Form] to Current [version of Form] |
 |
Delete | – – | Removes the selection |
 |
Download | – – | Download |
 |
Locate and Display Info | – – | Search, View, Display |
 |
Calendar – Select Date | – – | Click to Open Calendar, then select a date |
 |
Select Time | – – | Click to open a drop-down menu of standard “time” options. After the selected time displays in the field, you may customize it for the record. |
 |
Increase Numeric Value | – – | Click the top arrow to increase the value in the field |
 |
Decrease Numeric Value | – – | Click the bottom arrow to decrease the value in the field |
 |
Manage Links | – – | Click this button to initiate the process to add, edit, and remove Links. |
 |
Toggle Details On (form/folder) | – – | This option displays only when a Site or Folder is selected. When “On,” the screen displays Status Details for the selection. |
 |
Toggle Details Off (form/folder) | – – | This option displays only when a Site or Folder is selected. When “Off,” the screen displays Set Folder Action buttons and high-level Status Summaries. |
 |
Export Data | – – | Use this option to Export data to a file. |
 |
Previous | Ctrl + Shift + P (Previous)* | Use this option to navigate to the previous form in the tree. |
 |
Next | Ctrl + Shift + N (Next)* | Use this option to navigate to the next form in the tree. |
 |
Save | Ctrl + Shift + S (Save) | Use this option to save data on the current form. |
 |
History | – – | Use this option to open the History dialog box. Review historical information in the History and Journal tabs. |
 |
Overflow | – – | This button displays (on the right side of the screen) when all toolbar buttons cannot display due to screen size. Click this button and click an option to make a selection. |
 |
Marking Buttons display a predefined color and shortcut key that CANNOT be changed AND a predefined name that MAY BE CUSTOMIZED in your environment. | – – | Open the Marking menu and click on an option to select.
Optionally, you may use the “Marking” buttons in the Set Folder Action tile. Button name may be customized in your environment. |
 |
Mark Form (Blue) | Ctrl + Shift + U (Mark Blue) | Use this option to mark the current form with a Blue flag. |
 |
Mark Form (Green) | Ctrl + Shift + G (Mark Green) | Use this option to mark the current form with a Green flag. |
 |
Mark Form (Red) | Ctrl + Shift + R (Mark Red) | Use this option to mark the current form with a Red flag. |
 |
Mark Form (Yellow) | Ctrl + Shift + Y (Mark Yellow) | Use this option to mark the current form with a Yellow flag. |
 |
Mark Blank | Ctrl + Shift + B (Blank) | Use this option to mark a form blank. The button updates to show UnMark Blank option. |
 |
UnMark Blank | Ctrl + Shift + B (Undo Blank action) | Use this option to undo the Mark Blank setting. |
 |
Verify | Ctrl + Shift + V (Verify) | Use this option to verify the current form or folder.
Click the Verify button on a verified form to change status to unverified. |
 |
Lock Form | Ctrl + Shift + L (Lock) | Use this option to Lock the current form, rendering the form as read-only. |
 |
Unlock Form | Ctrl + Shift + L (undo Lock action) | Use this option to undo the Lock setting. |
 |
Freeze Form | Ctrl + Shift + L (Lock) | Use this option to Freeze the current form, rendering the form as read-only. |
 |
Unfreeze Form | Ctrl + Shift + L (undo Lock action) | Use this option to undo the Freeze setting. |
 |
Clear All | – – | Use this option to deselect all records in the dialog box. |
 |
Sign Form | Ctrl + Shift + I (Sign) | Use this option to sign the current form electronically. |
 |
Print Current Form | – – | Use this option to print the current form, along with its queries and audit trail. |
 |
Upload Data to the EDC Form | – – | Click this button to initiate the Upload Data process to add or update form data from a CSV file. |
 |
Randomize [Subject] in RTSM | – – | Use this option to initiate the Randomize Subject action.
This button displays in the system only when you click on a form designated to allow this type of RTSM integration for a subject in the EDC system. |
 |
Un-Randomize Subject | – – | Use this option to initiate the Un-Randomize Subject action. |
 |
Redispense Subject | – – | Use this option to initiate the Redispense action. |
 |
Dispensed Kit in Error | – – | Use this option to initiate the Dispensed Kit in Error action. |
 |
Create Subject in RTSM | – – | Use this option to add a subject in the Sitero Mentor RTSM system from the Sitero Mentor EDC system.
This button displays in the system only when you click on a form designated to allow this type of RTSM integration for a subject in the EDC system. |
 |
Discontinue [Subject] in RTSM | – – | Use this option to discontinue a subject in the RTSM system from the EDC system.
This button displays in the system only when you click on a form designated to allow this type of RTSM integration for a subject in the EDC system. |
 |
Dispense [Subject] in RTSM | – – | Use this option to initiate the Subject Dispense action.
This button displays in the system only when you click on a form designated to allow this type of RTSM integration for a subject in the EDC system. |
 |
Replace Kit [for Subject] in RTSM | – – | Use this option to replace a kit for a subject in the RTSM system from the EDC system.
This button displays in the system only when you click on a form designated to allow this type of RTSM integration for a subject in the EDC system. |
