

Search The Knowledge Base
Lock and Unlock Forms in Mentor EDC
- To review a video that shows this feature, click this link Lock and Unlock Forms in Mentor EDC.
- A user must have the appropriate permissions to access the EDC features to Lock Forms and Freeze Data.
- Click here if your system is configured to Freeze Forms and Lock Data.
- Typically, the types of users that have this permission are Monitors and Data Managers.
- After you Lock a form, the site may no longer edit the data (data is frozen).
- When this setting is applied at any level, all records below that level are included in the setting by default. Optionally, you may clear a check mark for specific levels to exclude them from the Lock.
- If a site needs to edit the data, they must contact the monitor or data manager with the request.
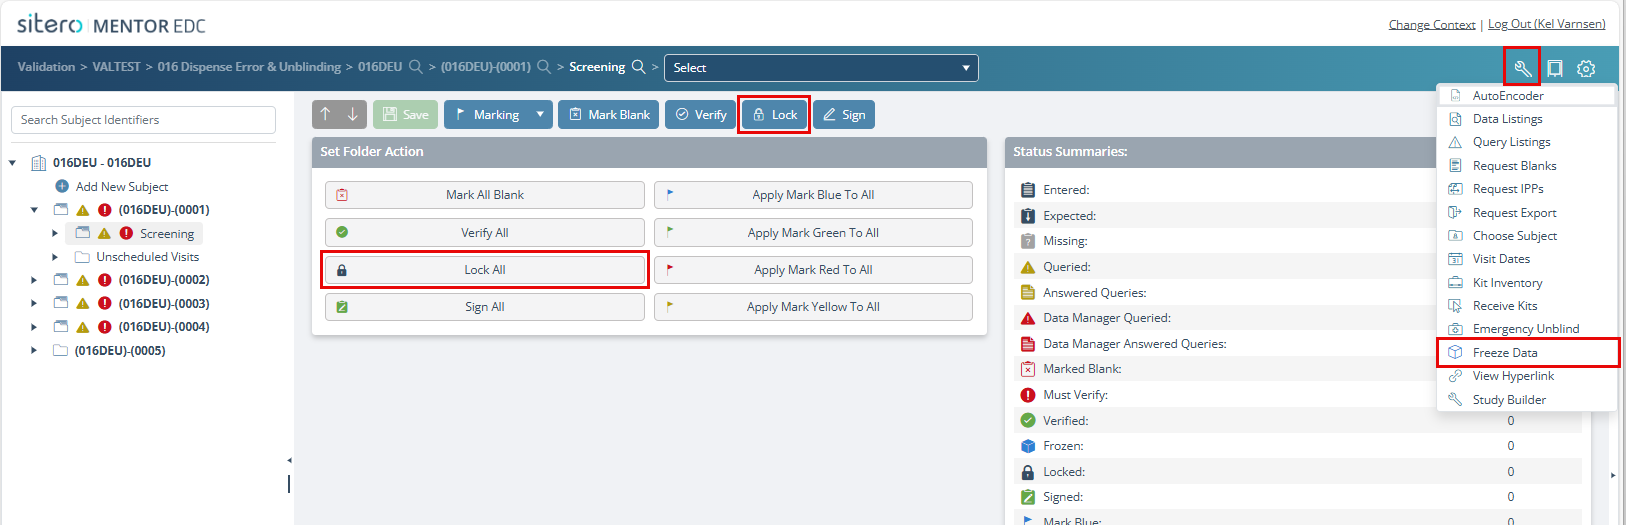
- The tools menu (wrench) at the top of the screen displays the Freeze Data option that can be used in conjunction with the Lock Form feature.
- The Unlock Form and Unlock All buttons display on the main screen when applicable and the Unfreeze Data option displays in the Tools menu when applicable.
- After completing the steps to Lock and Unlock forms plus Freeze and Unfreeze data:
- An on-screen message displays in progress and completed (or failed). A confirmation dialog box DOES NOT display.
- The icon for each form in the folder displays a symbol to denote the current status.
- The History tab records the updated status, and the audit comment indicates Setting Folder Status (at the folder level).
A permissioned user may apply this setting at the following levels:
- Environment – When the setting is applied at the Environment level, all records are included.
- Site – When the setting is applied at the Site level, all Subjects and Subject Folders/Forms are included.
- Apply this setting at the Subject level to allow Site to remain Open/Unlocked.
- Subject – When the setting is applied at the Subject level, all Subject Folders/Forms are included.
- Subject Folder – When the setting is applied in Subject Data for a Subject Folder, all Subject Form records are included.
- Subject Form – When the setting is applied in Subject Data for a Subject Form, the individual Form record is included.
Lock One Form
Follow the steps below to Lock a form.
- Select a form in the navigation tree.
- Click on the Lock button.
- The form is locked immediately, no dialog box displays for confirmation; screen displays progress/status.
- A lock symbol displays on the navigation tree next to the form name.
- You may Lock a completed form or a blank form.
Unlock One Form
Follow the steps below to Unlock a form.
- Select a locked form in the navigation tree.
- Click on the Unlock button.
- The form is unlocked immediately, no dialog box displays for confirmation.
- The lock symbol is removed on the navigation tree next to the form name.
Lock All Forms
Follow the steps below to Lock all forms in a folder.
- Select a folder in the navigation tree.
- Click on the Lock All button in the Set Folder Action tile of the main screen.
- All forms are locked immediately, no dialog box displays for confirmation; screen displays progress/status.
- A lock symbol displays on the navigation tree next to all form names.
Unlock All Forms within a Folder
Follow the steps below to Unlock all forms within the selected folder.
- Click to select a Folder in the navigation tree.
- Click the Unlock All button in the Set Folder Action tile of the main screen.
- With the folder selected, click the Unlock button from the top toolbar or use the Keyboard Shortcut (Ctrl + Shift + L).
– OR –
