Depots Screen in Mentor RTSM – Overview
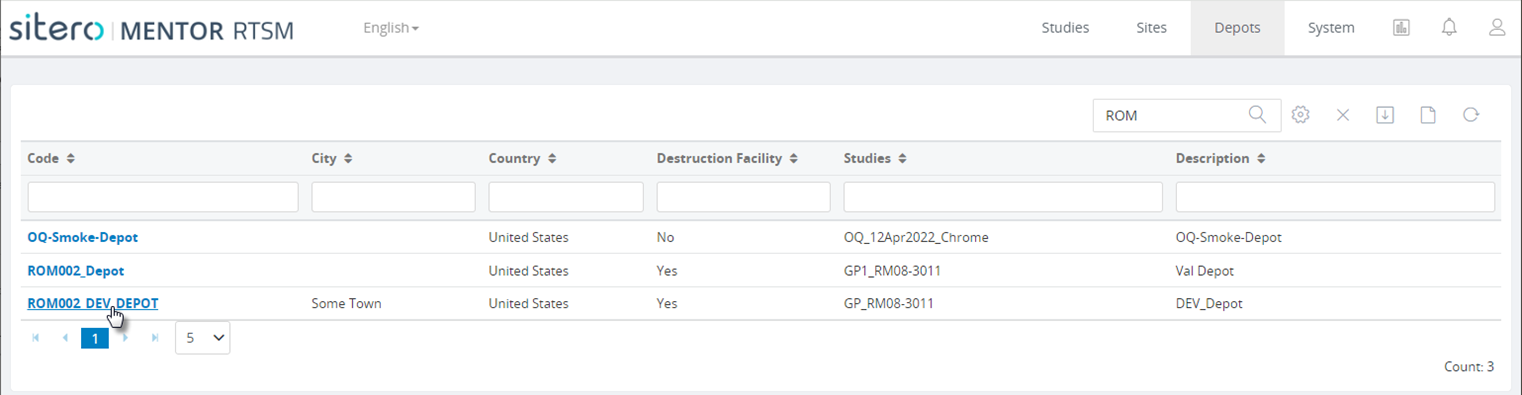
Click on the Depots button (top of screen) to display a list of Depots to which your credentials allow access.
CAUTION: Depot permission credentials may be blinded or unblinded. When Depot permission credentials are NOT blinded, the unblinded discrete kit information displays for depot user.
Remember!
The content that displays on the Dashboard is dependent on the permissions associated with each User’s Role.
- Log in to the system and click the Depots button at the top of the screen to begin.
- The Depots screen displays a grid showing all depots to which your credentials allow access.
- Click on a link in the Code column to select a Depot and display the Depots Dashboard.
- Scroll down for details about the information that displays and actions that are available on the main screen and in the left side tile.
- Remember: your system permissions determine if you see some or all of the features and functions described below.



- Permission-based features and functions include the ability to view and manage Depot Shipments and Inventory.
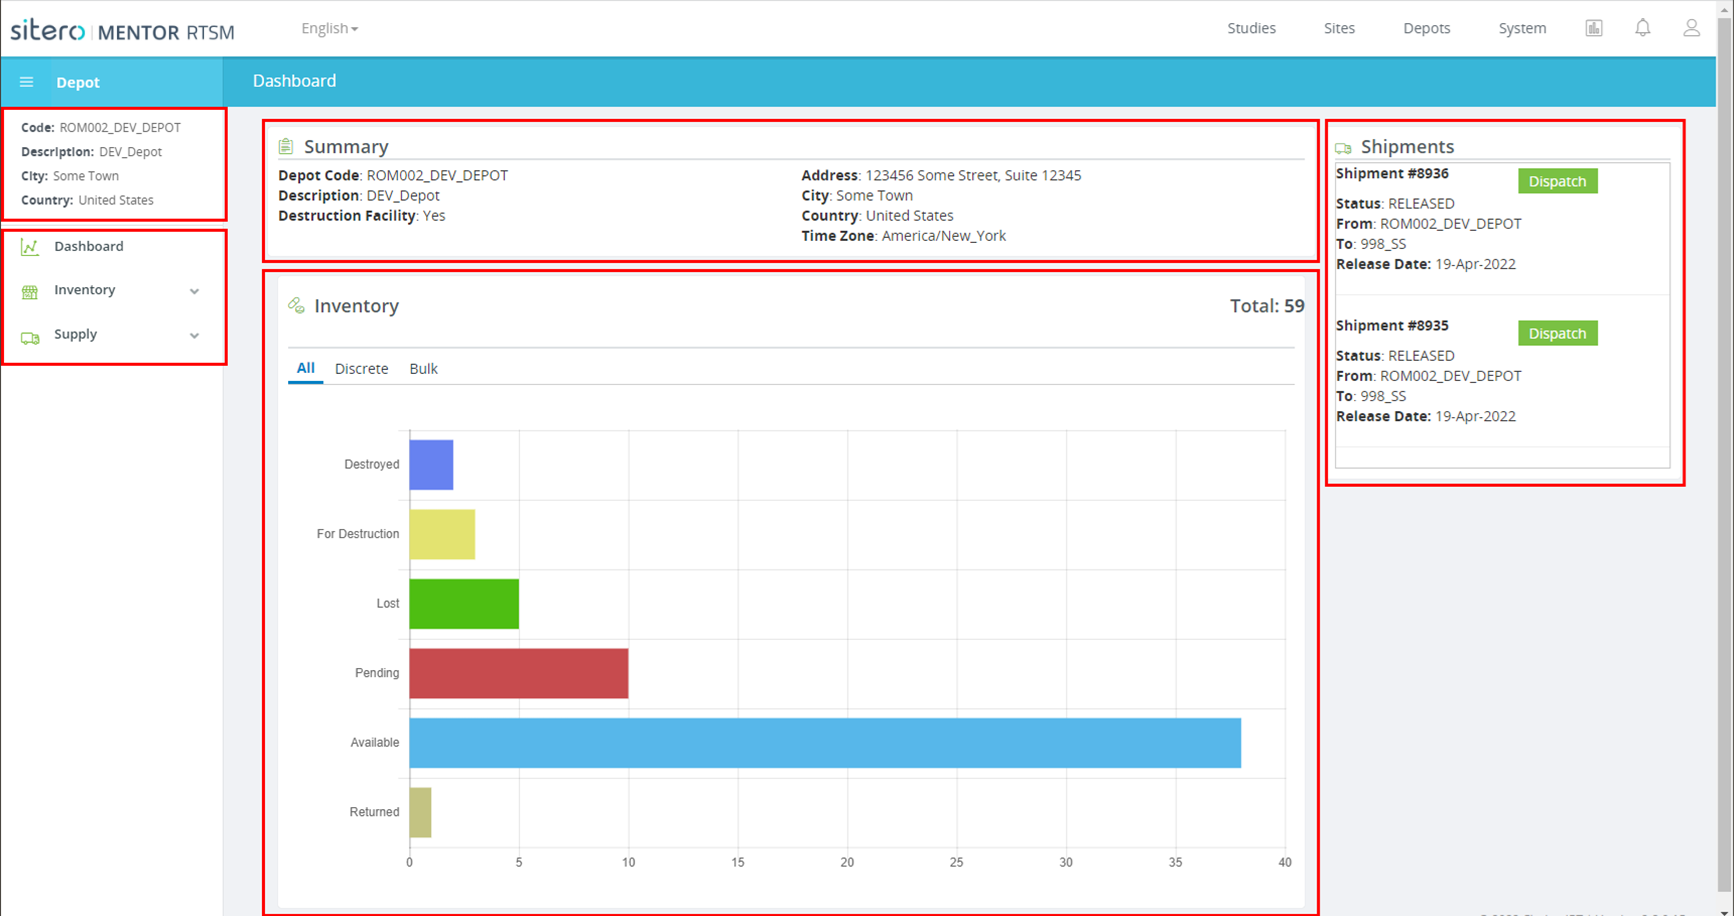
- The Depots main screen displays a dashboard containing information and functionality in five (5) distinct tiles.
Tiles include: - Information for the Selected Depot
- Functional Menu (buttons)
- Summary Information
- Graph that displays Inventory details under Tabs (tab name=current status)
- Shipment Details with functional buttons that display when available, allowing you to manage shipments directly from the dashboard screen.
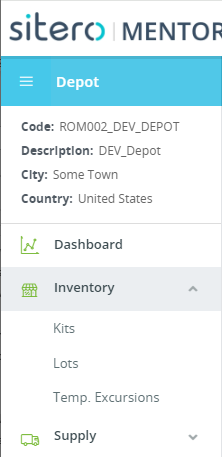
- Click the arrow in the left side menu to display options for the Inventory and Supply categories.
- Click the link (Inventory Accountability Status Descriptions) to open a table that describes the Status options for the Discrete Grid menu; link opens in a new tab or browser window.

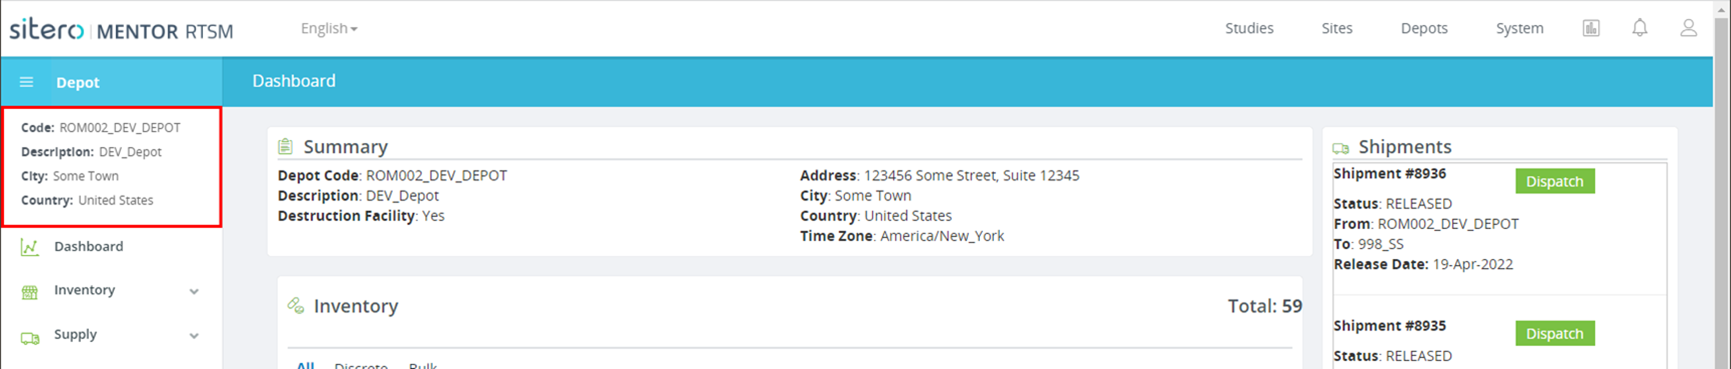
Depot Information Tile
Click on a link in the code column of the Depots grid to select a depot.
The Depot information tile displays high-level detail for your selection.

Dashboard
Click the Dashboard button in the left side menu to return to this screen from other Depot screens.
Inventory
Open the menu and click on an option to select Manage Kits, Lots, Temp. Excursions.
REMEMBER: The main difference in Inventory management between Discrete and Bulk inventory is that the Bulk inventory view may include the ability to update the available quantity.
Kits
- Click to open the Inventory menu and click the Kits button.
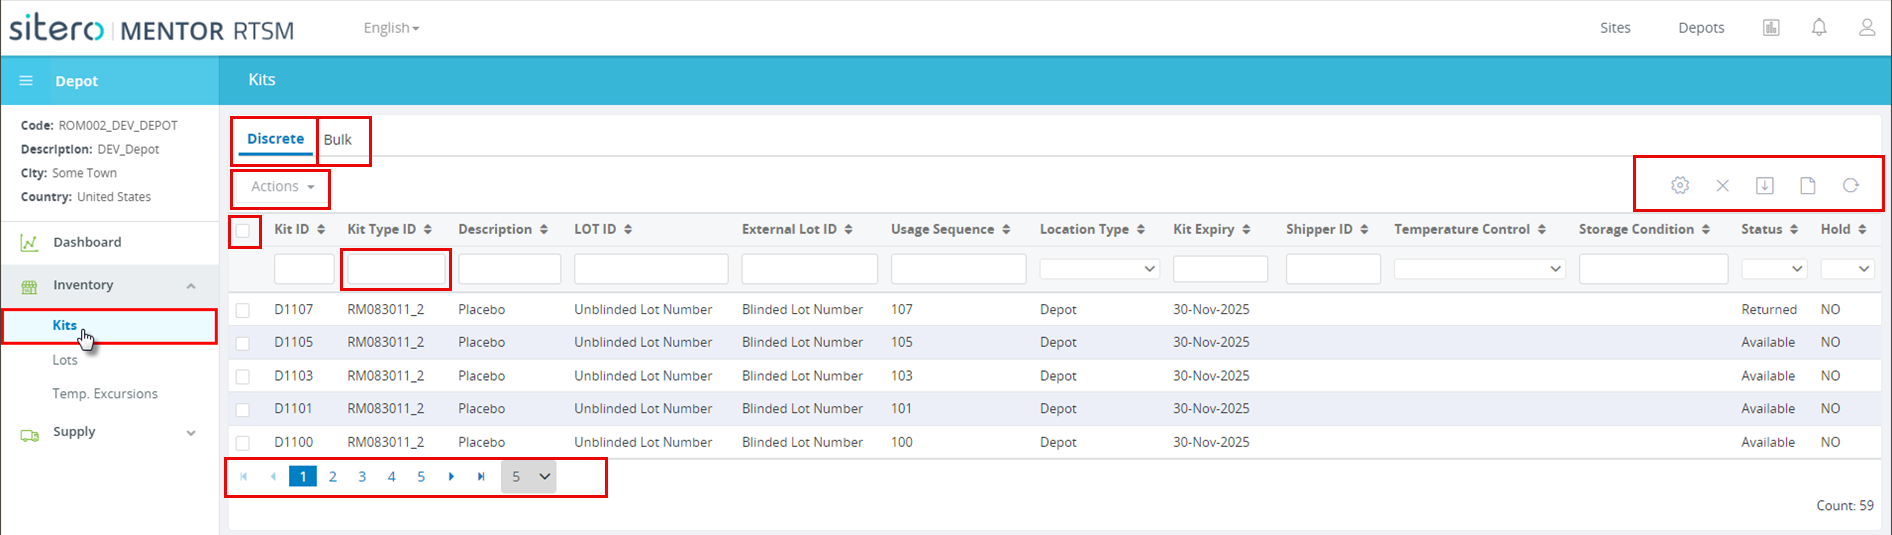
- The main screen displays a grid with separate tabs for Discrete and Bulk Kits.
- Tabs display for one (1) or both categories, based on your study configuration.

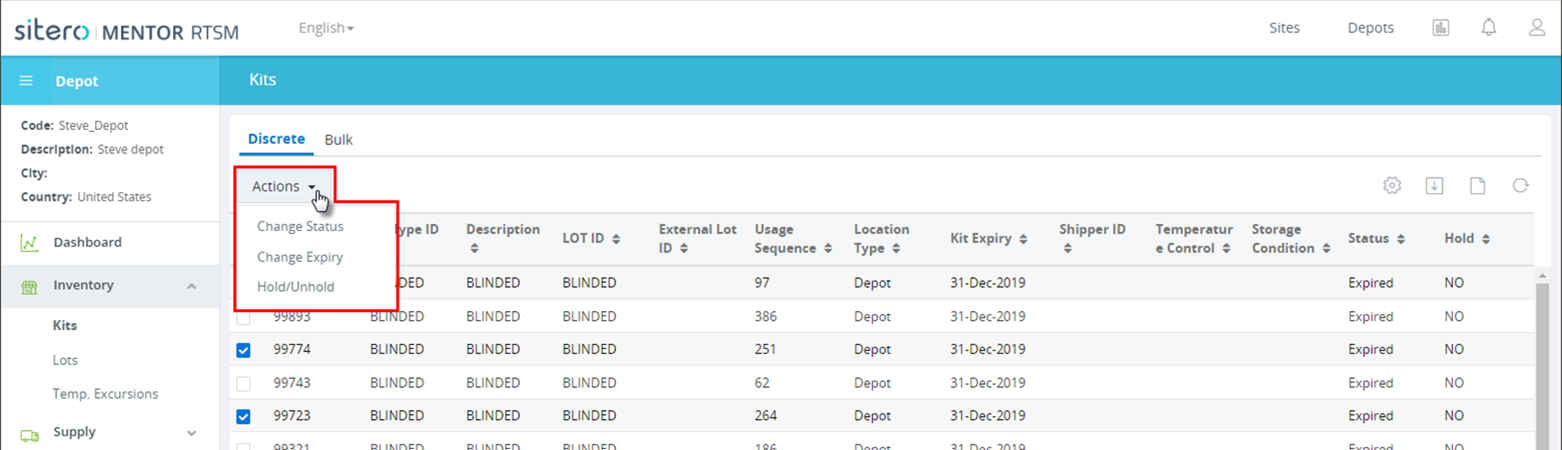
Discrete Tab for Kit Records
- Select the Discrete tab.
- Use the check boxes to select one (1) or multiple kits to receive same status update.
- Open the Actions menu and click on an Action to make a selection. Refer to the Apply action to multiple records article for additional information.
- Actions may include:
- Change Status – Options include Damaged and Lost
- Change Expiry – Click on calendar and select new expiration date
- Hold/Unhold – When record is On Hold this option allows you to release the hold (Hold = No). When record is NOT On Hold, using this option changes it to Hold = Yes.
- A dialog box displays options for the action selected, after selecting an option, additional screens may display further settings or options. Follow the onscreen prompts to complete the action. Remember: You cannot change the status of a Kit for records with status of Dispensed, Transit, Replaced, Pending, Destruction, or Destroyed.

Bulk Tab for Kit Records
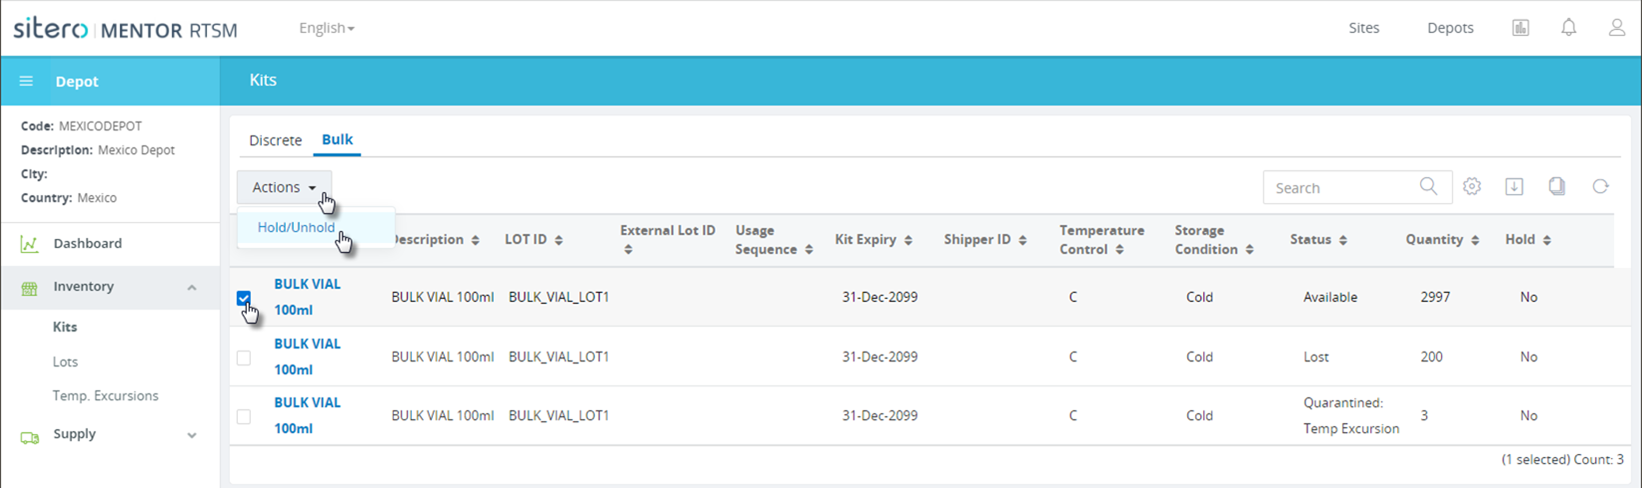
- Select the Bulk tab.
- Click in one or more check boxes to select records.
- Open the Actions menu on this screen to change status Hold/Unhold for selected Bulk Kits.
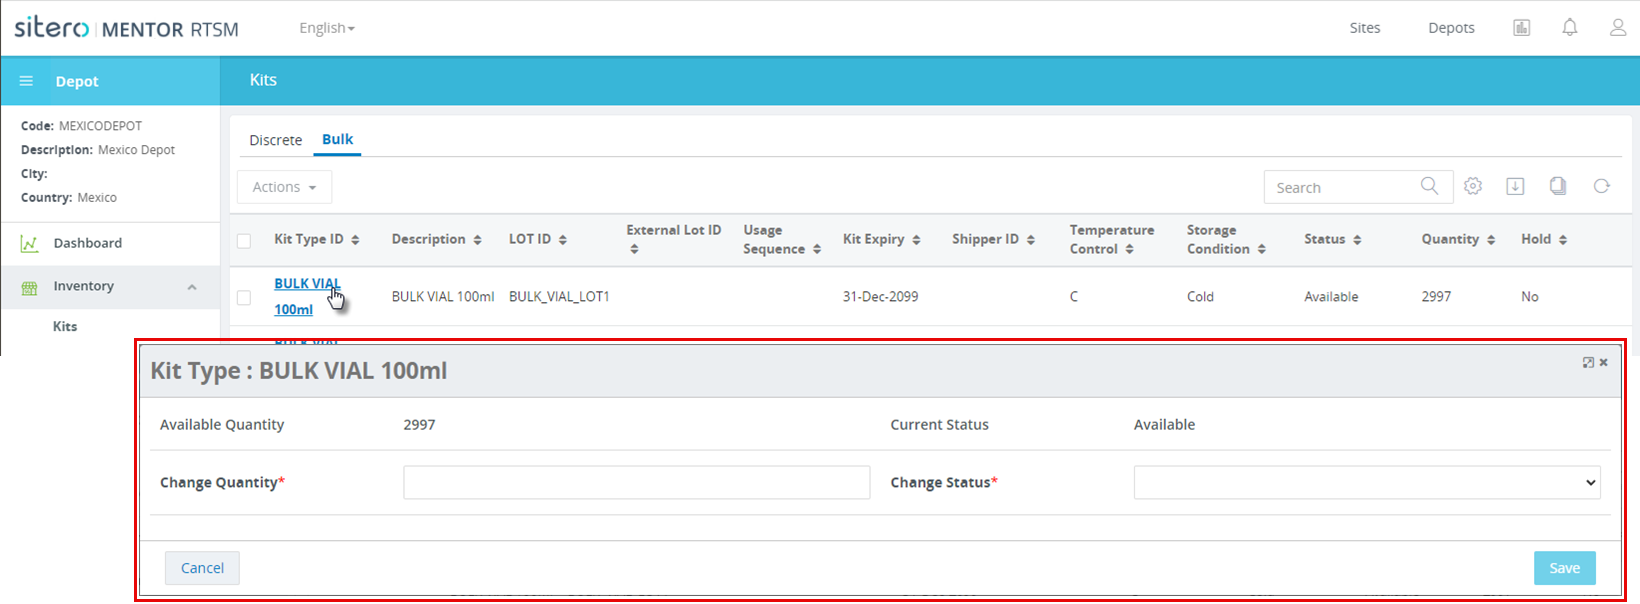
- Click on a link in the Kit Type ID column to open a record and use the fields and options to change available quantity or status.


Lots
- Click to open the Inventory menu and click the Lots button.
- The main screen displays a grid of Inventory Lots to which your permissions allow access.
- Optionally, click the more link (in the Countries column), if available, to display additional information in the grid.
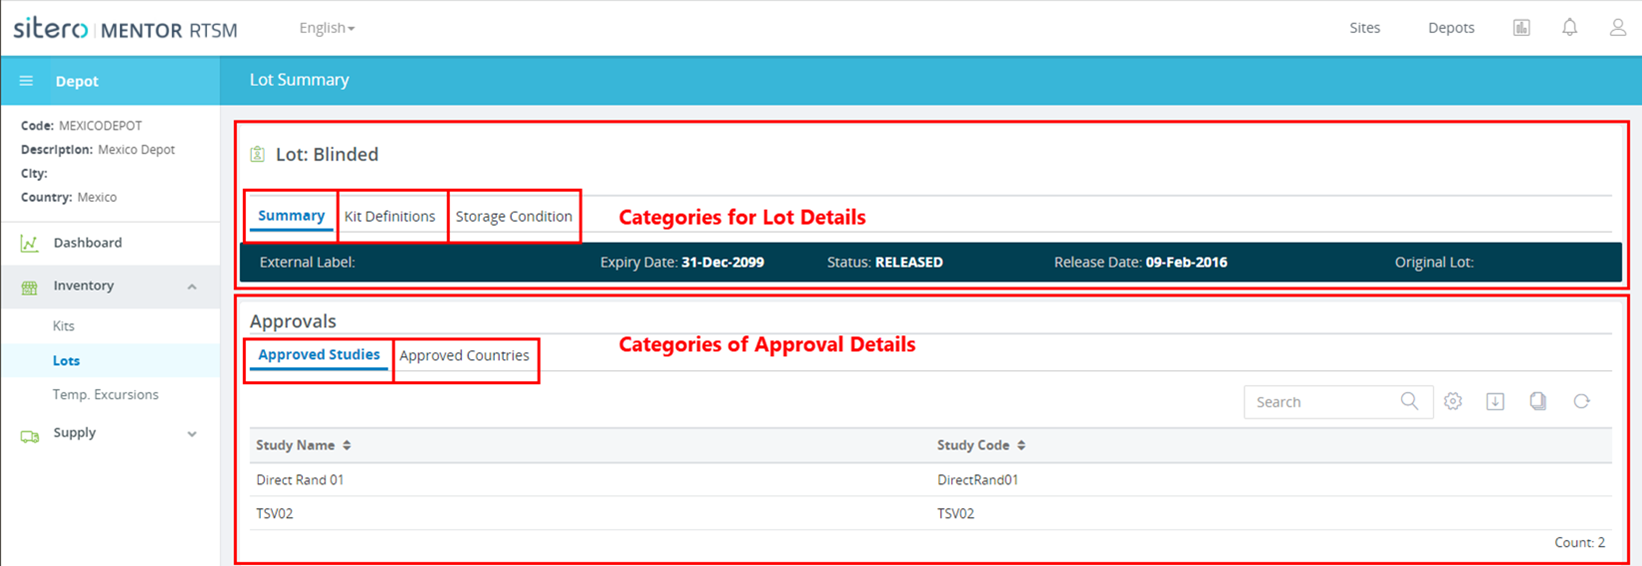
- Click on a link in the LOT ID column to display information about the selected Lot.
- The Lot Summary screen displays information in two (2) tiles, which may contain additional tabs with details.

Temp. Excursions [at a Depot]
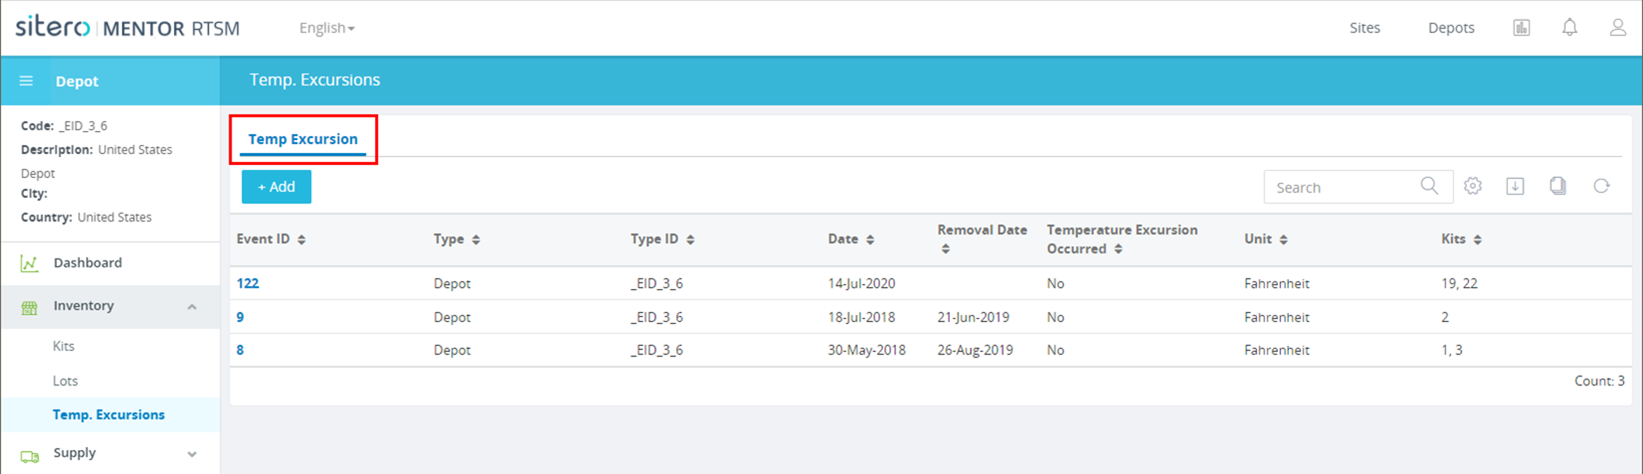
- Click to open the Inventory menu and click the Temp. Excursions button.
- The main screen displays a grid of Temperature Excursion Events to which your permissions allow access.
- Use the features on this screen to add, review, and delete Temperature Excursion Events.
- A permissioned Study, Site, or Depot user may update the Status of Damaged or Missing kits during the receive process for a temperature excursion record. All non-damaged, non-missing kits are marked as quarantined for the TE shipment.
- When a quarantined kit is reviewed and released, only the quarantined kits are put back into inventory. The damaged and lost kits remain in their current status.

Supply
Open the menu and click on an option to select Shipments, Return Shipments, or Destruction.
Shipments
- Click to open the Supply menu and click the Shipments button.
- Click a link in the Code column to display details for the record.
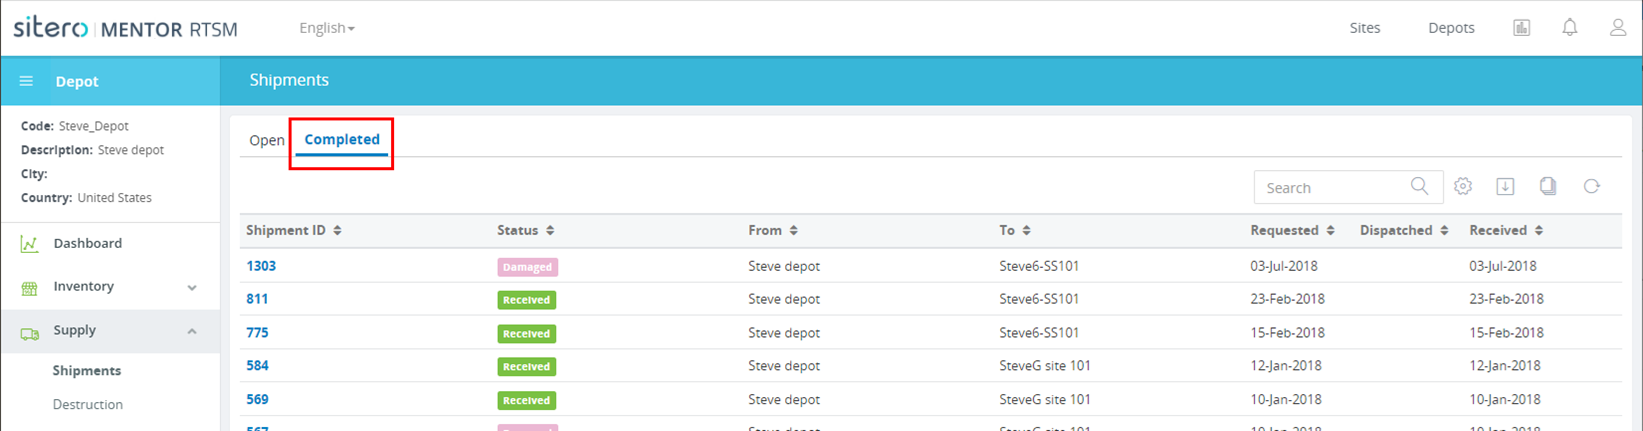
- The main screen displays a grid with separate tabs for Open and Completed records.
- After selecting a record, buttons and additional details display. Button options include View Notes, Pick List, Cancel Shipment, and Dispatch Shipment.



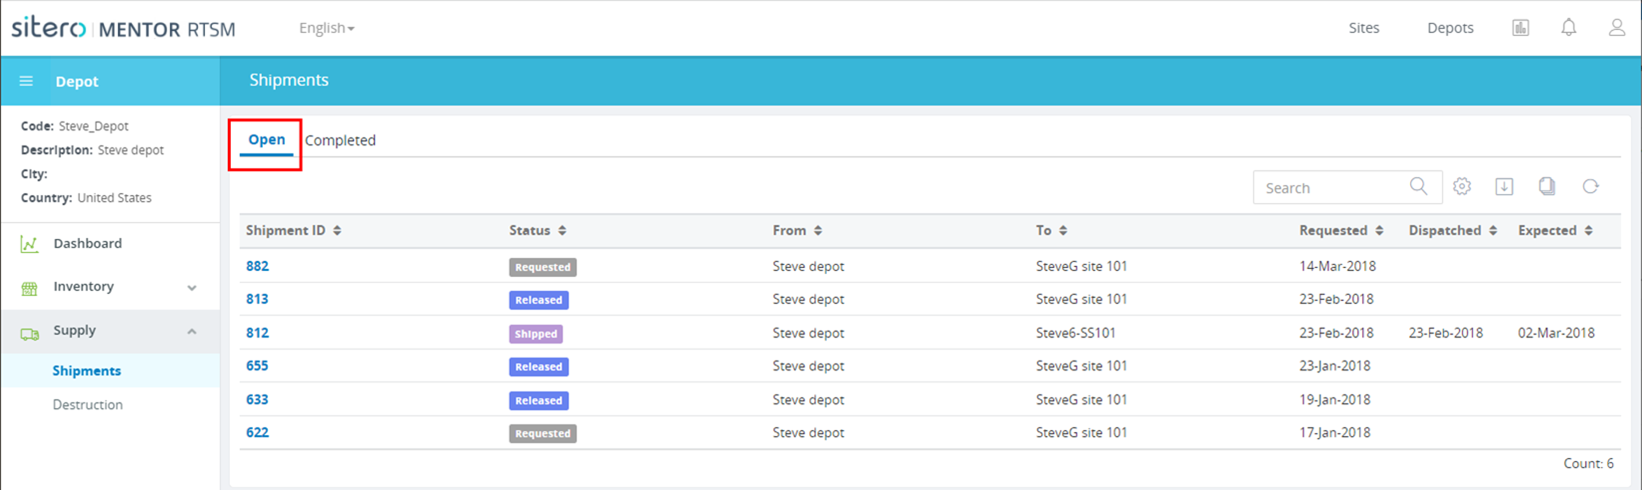
Based on your permissions and system settings, you may be able to initiate actions from the Shipments tile on the Depot Dashboard or by clicking a link for a Shipment record in the Shipments grid.
View and Add Notes
- Select a Shipment record.
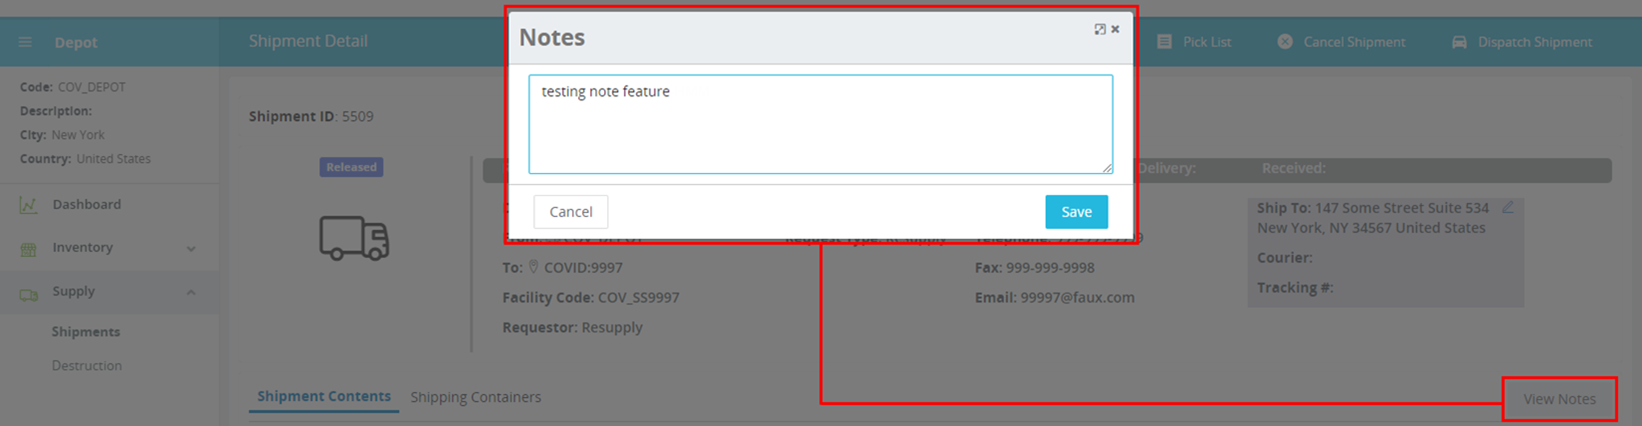
- Click the View Notes button located at the bottom left of the Shipment Detail main screen.
- A dialog box allows you to add or updates notes for the record.
- Click the Save button to complete the process.

Pick List (button)
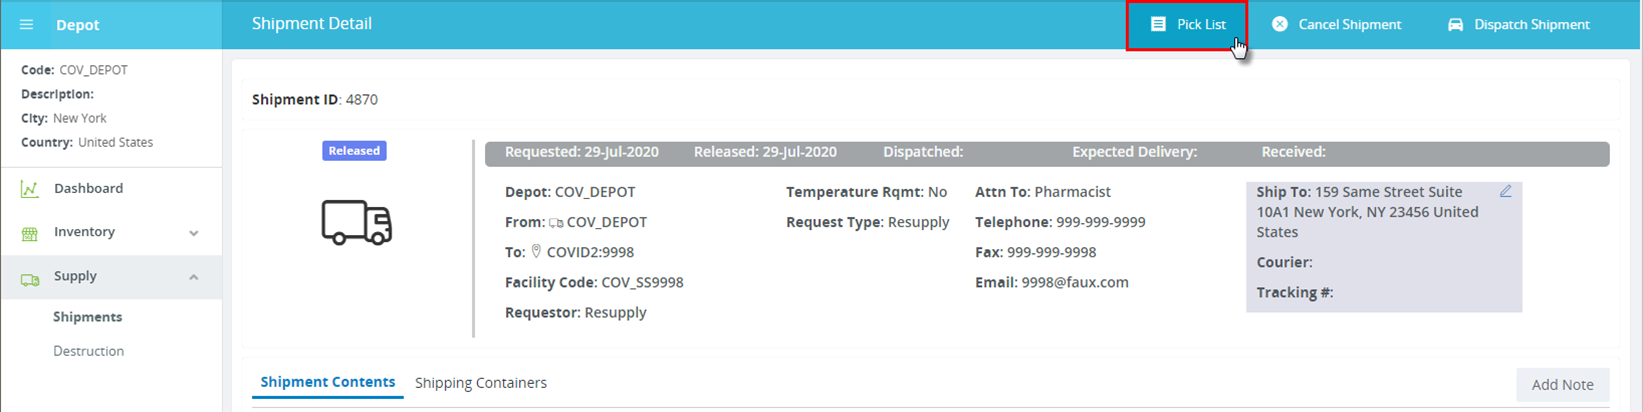
- Select a Shipment record.
- Click the Pick List button to generate a PDF Shipment Picklist Alert.
- The PDF is located in the folder where your system stores downloads. Based on the browser in use, you may see an access option on your screen. Note: The Alert may contain unblinded information.

Cancel Shipment (button)
- Select a Shipment record.
- Click the Cancel Shipment button.
- A dialog box allows you to confirm your selection.
- Click the Yes button to continue and complete the action. Optionally, click the No button to abort the process.

Dispatch Shipment (button)
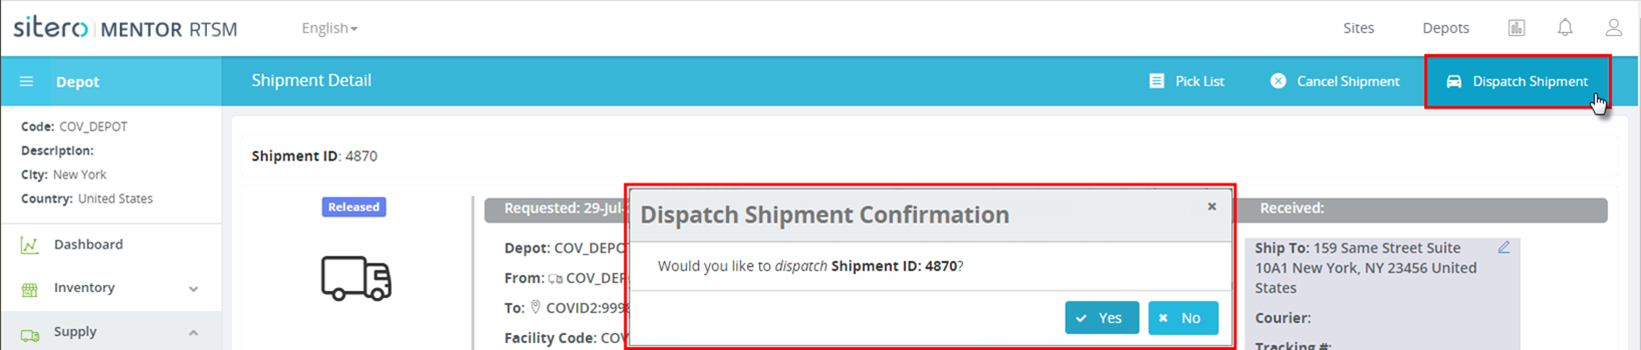
- Select a Shipment record.
- Click the Dispatch Shipment button.
- A dialog box allows you to confirm your selection.
- Click the Yes button to continue and complete the action. Optionally, click the o button to abort the process.

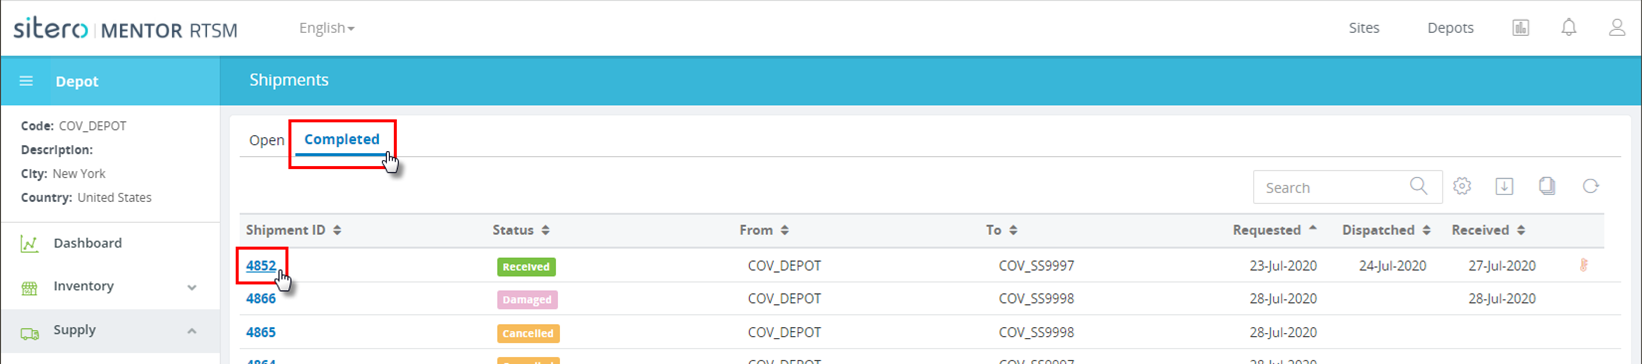
Completed (Tab)
- On the Depot screen, open the Supply menu (left side), and click to select Shipments.
- The grid displays a list of Shipments that have completed the receiving process.
- Click to select the Completed tab.
- The status column allows you to see color coded information about the status of each Depot Shipment record.
- Click a link to select a Shipment record in the grid to view additional detail and options.

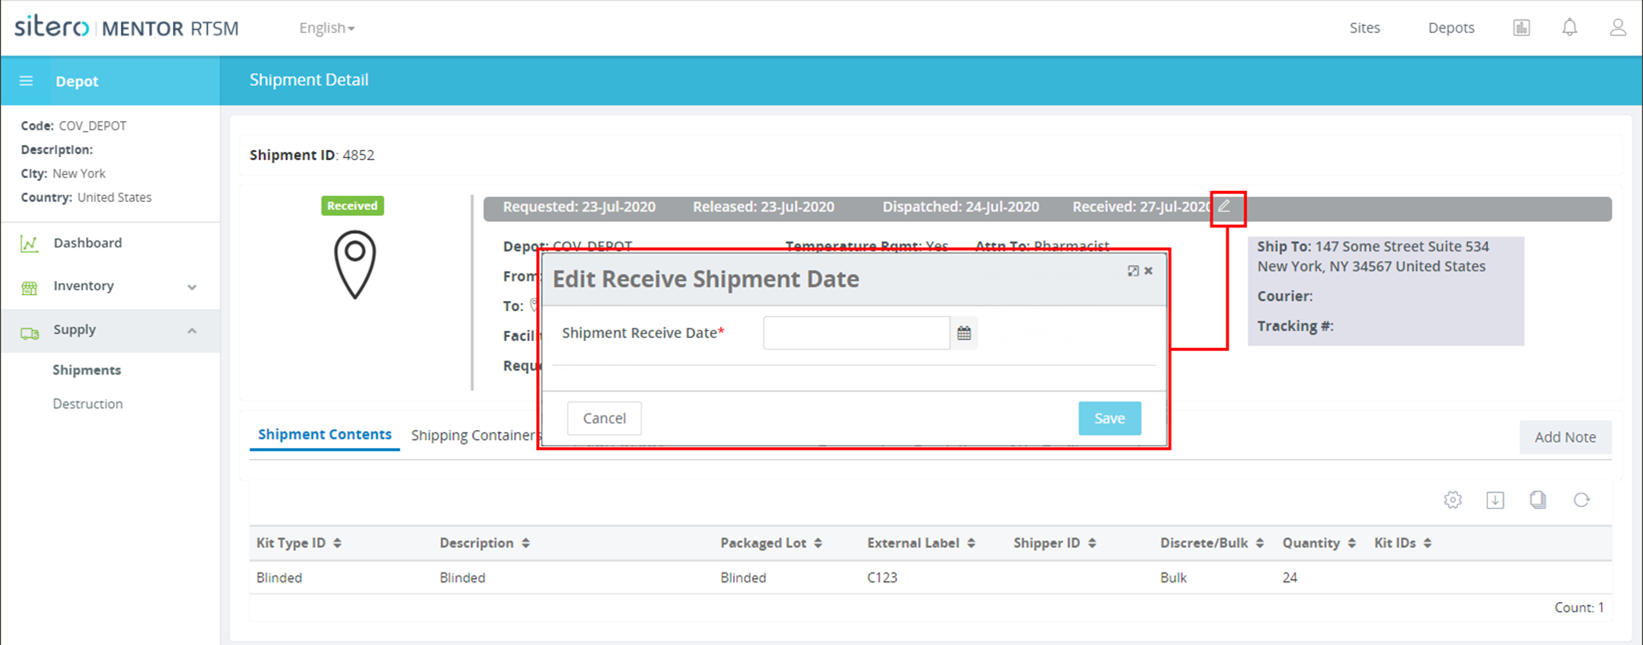
- Optionally, click the edit button (pencil in Shipment ID tile) to update Shipment Date.
- Optionally, click the edit button (pencil in “Ship To” tile) to update the Courier and Tracking information.
- Click the Save button to complete the process.

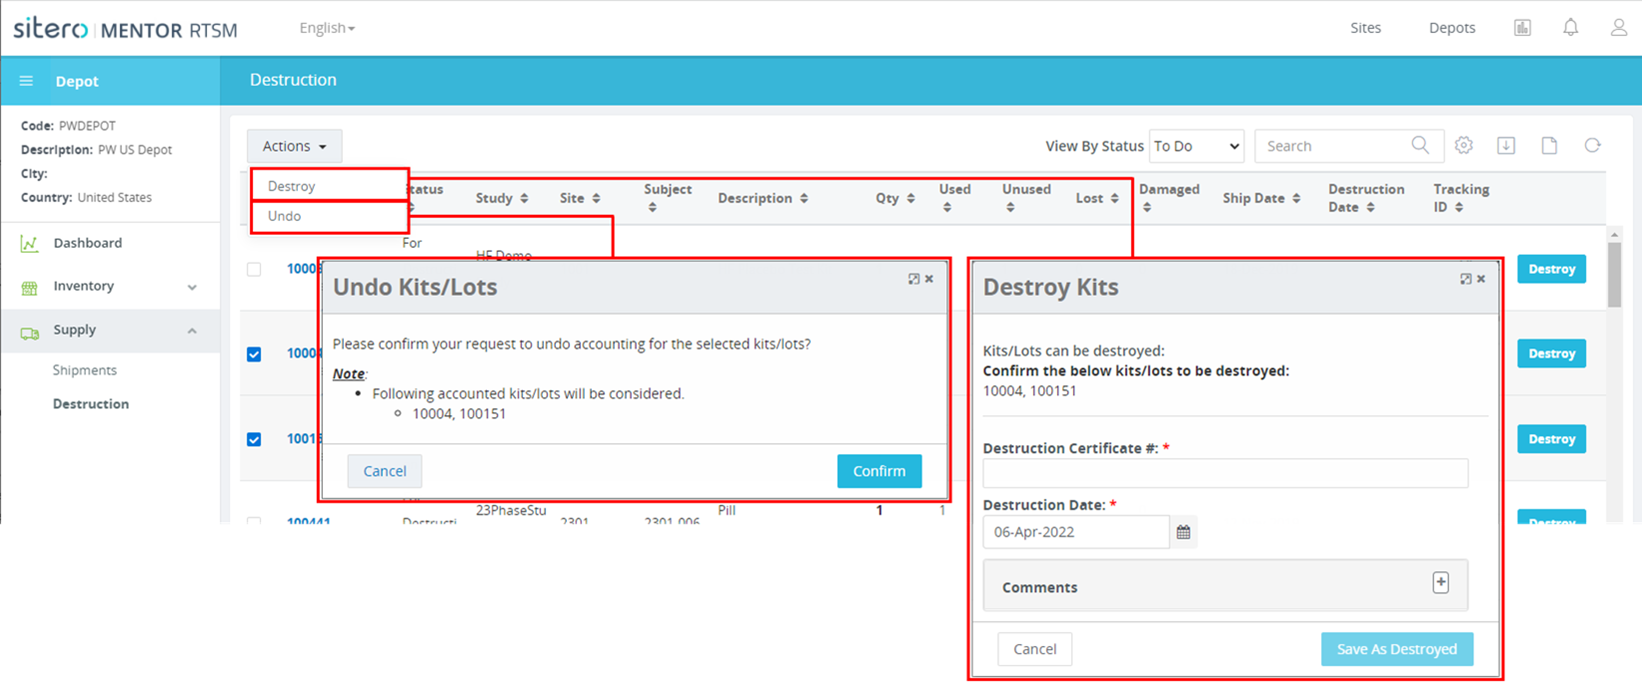
Destruction
- Click to open the Supply menu and click the Destruction button.
- The Destruction screen displays a grid showing return shipments and their status.
- Click in one or more check boxes in the grid and open the Actions menu to select an option to be applied to the selected records.
- Refer to the Apply action to multiple records article for additional information.

- Select a Shipment record.
- Click the Pick List button to generate a PDF Shipment Picklist Alert.
- The PDF is located in the folder where your system stores downloads. Based on the browser in use, you may see an access option on your screen. Note: The Alert may contain unblinded information.
Cancel Shipment (button)
- Select a Shipment record.
- Click the Cancel Shipment button.
- A dialog box allows you to confirm your selection.
- Click the Yes button to continue and complete the action. Optionally, click the No button to abort the process.
Dispatch Shipment (button)
- Select a Shipment record.
- Click the Dispatch Shipment button.
- A dialog box allows you to confirm your selection.
- Click the Yes button to continue and complete the action. Optionally, click the o button to abort the process.
Completed (Tab)
- On the Depot screen, open the Supply menu (left side), and click to select Shipments.
- The grid displays a list of Shipments that have completed the receiving process.
- Click to select the Completed tab.
- The status column allows you to see color coded information about the status of each Depot Shipment record.
- Click a link to select a Shipment record in the grid to view additional detail and options.
- Optionally, click the edit button (pencil in Shipment ID tile) to update Shipment Date.
- Optionally, click the edit button (pencil in “Ship To” tile) to update the Courier and Tracking information.
- Click the Save button to complete the process.
Destruction
- Click to open the Supply menu and click the Destruction button.
- The Destruction screen displays a grid showing return shipments and their status.
- Click in one or more check boxes in the grid and open the Actions menu to select an option to be applied to the selected records.
- Refer to the Apply action to multiple records article for additional information.

- Select a Shipment record.
- Click the Dispatch Shipment button.
- A dialog box allows you to confirm your selection.
- Click the Yes button to continue and complete the action. Optionally, click the o button to abort the process.
Completed (Tab)
- On the Depot screen, open the Supply menu (left side), and click to select Shipments.
- The grid displays a list of Shipments that have completed the receiving process.
- Click to select the Completed tab.
- The status column allows you to see color coded information about the status of each Depot Shipment record.
- Click a link to select a Shipment record in the grid to view additional detail and options.
- Optionally, click the edit button (pencil in Shipment ID tile) to update Shipment Date.
- Optionally, click the edit button (pencil in “Ship To” tile) to update the Courier and Tracking information.
- Click the Save button to complete the process.
Destruction
- Click to open the Supply menu and click the Destruction button.
- The Destruction screen displays a grid showing return shipments and their status.
- Click in one or more check boxes in the grid and open the Actions menu to select an option to be applied to the selected records.
- Refer to the Apply action to multiple records article for additional information.