Visit and Visit Steps Overview in Mentor RTSM
Click this link [Subject Management Details] for additional information about Processing Subject Visits.
Subject Visits are the events during which most information is collected, actions are performed, and dispensing occurs. These events, or functions, occur within the visits in a series of Visit Steps (e.g. Collect Data, Strata).
The Study Visit Schedule configured in this system, is based on the study protocol and represents the set of Visits that all Subjects follow from beginning to end in order to complete the study.
There are four exceptions to this rule:
- When Visit Skips are used, subjects may skip one or more visits in the schedule.
- Unplanned Visits are optional visits inserted between planned visits, which subjects may also attend.
- In some cases, a study may end for all subjects at some point in time not related to the visit schedule. In this case, subjects may be considered complete if some other customized rule is met, e.g., they have received 6 months of treatment.
- Use a Planned Unblinding Visit for a specific type of study design where all subjects are unblinded at a designated visit to facilitate decisions on the subject’s next actions in the study.
In most cases, a visit may have any number of visit steps associated with it, based on the study protocol.
During a Subject Visit, the configuration in this system follows each step, in sequence in the visit until visit completion. If some visit steps are completed and others are not, then the visit is not yet complete and needs to be resumed or restarted at some point in order for the subject to progress to the next visit.
Since this system is web-based, the user interface attempts to group as many (data collection type) visit steps together as possible, so that the user does not need to go through multiple pages (screens) to complete a visit. However, certain visit steps are “disruptive” to the flow of a visit (e.g., screening, randomization, dispensing) since they are complex activities which may themselves require multiple screens for confirmations. There may be groups of data collections before and/or after a disruptive visit step, depending on the setup of the study in this system.
Collect Subject Data
Your environment may be configured to collect data about a subject during any visit. Your configuration may vary, based on the study protocol.
The system displays the subject custom data per visit and allows for each individual data collection and visit combination to be edited by a permissioned user.
The system uses the latest value for the subject custom data and visit combination when generating and regenerating the Subject Visit confirmation reports.
If you are collecting multiple data points in the same visit, this system typically groups them together on one screen, but it may vary based on the visit configuration.
A red asterisk (*) on a field indicates it is required and must be populated in order to proceed.
- Select from a drop-down menu
- Enter text
- Enter a numeric value
- Enter or select a date
- Enter or select a date and time
Enter information then click the Next button to continue. When all Subject data is entered, click the Save button; if no further data is required, clicking the Next button will perform the Save function.
If data points are numeric, date, or date/time formats, range validations may be applied, based on the study protocol. An error message displays on screen when an entry is outside of the validation range.
Collect Subject Strata
Your environment may be configured to collect stratification data about a subject at the randomization visit or any visit prior to a randomization visit, based on the study protocol.
Use this specially configured data (system action) to make an assignment to a treatment group through the configured randomization list or randomization algorithm based on the study protocol.
Subject Strata data entry is always done using a drop-down menu, where each range in a stratum is a choice in the menu, regardless of the nature of the underlying data (text, numeric, or date).
Collect Subject Dosing Factors
Your system may be configured to collect dosing factor data about a subject at any visit based on the study protocol. Use this (configured) data to determine the study drug to dispense to the subject at a visit, based on the study protocol.
Subject Dosing Factor data entry is always done using a drop-down menu, where each range in a dosing factor is a choice in the list, regardless of the nature of the underlying data (text, numeric, or date).
Question Sets
Question Sets provide a more flexible way to collect data than simple data collections.
A Question Sets visit step may be located at any position during a visit (before or after data collection, dispensing, or other functions).
A question set may reveal each question in the set one at a time or in groups.
Select, or enter, an answer then the next question in the set displays based on the response.
For branched question sets, the answer selected may determine the next question set.
The question set proceeds, populating further questions until it reaches the end of the set.
Once you reach the end of the question set, click the Next button to proceed with the visit.
Unplanned Visit
Unplanned visits occur when the visit schedule is configured in the system to support them, based on the study protocol.
Each unplanned visit (single or recurring) is specifically configured as a “possible” extra visit in between two planned visits.
The Unplanned Visit button (button name may be customized) displays if the selected subject is “active” in the study and there is an unplanned visit configured in the system before their next planned visit.
You have the choice to process the next planned visit for the selected subject or perform the configured unplanned visit.
When the unplanned visit function is invoked, the system moves ahead to normal visit and step processing for the unplanned visit which is after the last completed visit and prior to the next scheduled visit.
Planned Unblinding Visit
Use a planned unblinding visit for a specific type of study design where all subjects are unblinded at a particular visit (based on the protocol).
This action assists in decision making concerning the subject’s next actions in the study.
- The system confirms your action for planned unblinding by prompting you to confirm or cancel.
- If you select Cancel, then the subject remains in “blinded” status.
- If you select confirm, the system returns the subject’s unblinded treatment group description to you and allows you to click the Next button to advance to additional configured visit steps.
This function allows you to review the description prior to processing further data. The system DOES NOT allow cancelling of the unblinding after displaying the treatment group to you. The system only allows one planned unblinding event per subject. After you execute the unblinding action, this event is not reversible.
The system displays a planned unblinding event on the subject record once it has occurred.
The system differentiates a planned unblinding event from a break blind event, so there is no confusion. The subject’s treatment group and descriptions of the dispensed kits are visible within the subject details after unblinding.
Completion of All Visits in a Single Step
If the visit is configured to require completion of all the steps, then RTSM user must process the Visit as a single transaction including all Data Collection and Dispensing Visit Steps.
If the visit processing is cancelled prior to full completion, then the entire visit would be rolled back as if the visit was not processed at all.
Undo Visit
A permissioned user may Undo the last processed Visit Event.
- An Undo button displays on the Visit step that was last processed for a Subject on the Subject Completed Visits list in the Subject Detail screen.
- Click the Undo button to display the dialog box for the undo visit step. Enter a reason for change in the field and enter e-Signature for verification. Click the Confirm button.
- The system removes the visit record and “collected data” of any type from the subject’s history (but not from the audit trail) as well as reverses any status changes to subject and/or kits and/or randomization schedule which occurred during that visit step.
- Any visit step prior to the screen visit step cannot be undone.
- Upon Undo dispensing visit, the system shall set all the kits dispensed to Assigned but not used.
If the ‘undo’ option is performed on a question set visit step configured with function(s), after entering a reason, the following system actions occur:
- Remove the calculated function results from the subject’s history.
- Remove any function-related data assignments of any type from the subject’s history.
- If the data assignment is a custom data, the current value of the subject custom data shall reverse back to the collected value that occurred prior to the last visit step.
- When a subject data collection for question is removed through the process, the related subject’s cohort value is also reverted, if configured.
Edit Subject Data and Visit Dates
If your study configuration allows changes, you may change any Subject Data or Visit Dates after you have entered them.
- If your study requires you to enter Study Data, such as date of birth or initials, and you incorrectly typed in the data, you may change it if your study allows.
- To change the subject data, click on the Data tab at the top of the Subject screen. A Date link may display next to the subject data, click the link to initiate the action.
Regenerate Report
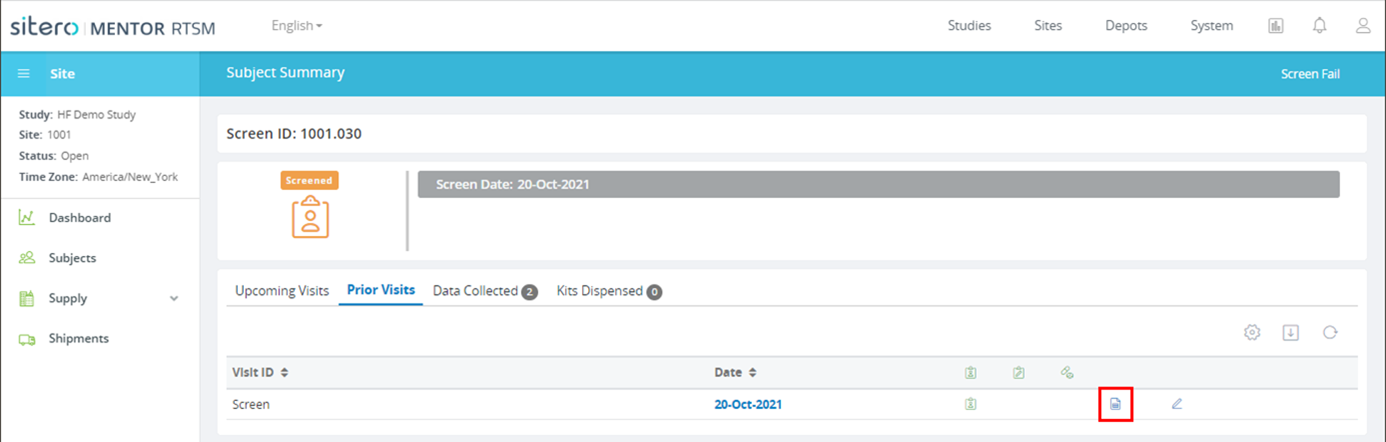
A permissioned user may Regenerate a Subject Confirmation Report from the Subject’s Visit Schedule tile.
All regenerated confirmation reports contain a disclaimer message in the footer.
Header and Footer text for the message may be customized in your environment; the default text states: “The data on this report represents current status and may have been changed from when the visit originally occurred.”
- The system enforces the following logic when regenerating the reports:
- Only confirmation reports that apply to the Subject Visit are available for selection.
Follow the steps below to Regenerate a Report.
- Click a link to Select a Subject and Display the Visit Schedule.
- Click the Regenerate Report button (page with grid) in the applicable row of the grid.
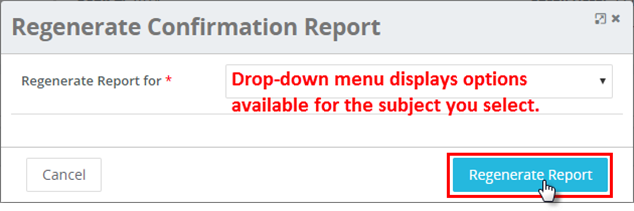
- The Regenerate Confirmation Report dialog box displays.
- Open the drop-down menu and click on an option to select the report type.
- Click the Regenerate Report button (bottom right).
- The system regenerates the report. File options display based on the browser in use. Navigate to the location where your browser saves downloads to locate your file. Use the options to open or extract the file.