

Mentor Fusion Tips and Tools
Refer to the details below to get familiar with how to access frequently used tasks in this system.
Data Review Workflow
The graphic below shows the Workflow overview.
Refer to the details below for step-by-step instructions.
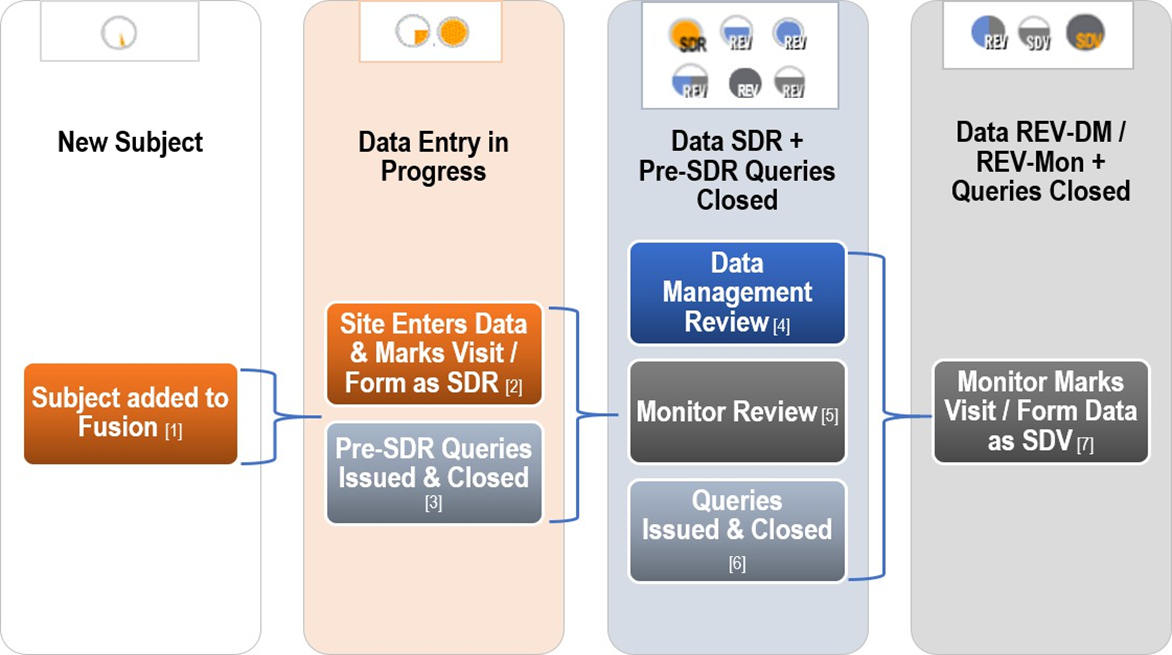
New Subject
1. Sites create new Subjects, all Visits will display as an empty pie icon.
Data Entry in Progress
2. Sites start to enter data.
3. After data is entered, Monitors and Data Managers can issue Pre-SDR Queries.
After all mandatory questions are entered for the ENTIRE Visit (all pages) or Form and all Pre-SDR Queries have been responded to, the Site marks the ENTIRE Visit (all pages) or Form as SDR.
Data SDR + Pre-SDR Queries Closed
After the ENTIRE Visit / Form is SDR by the Site,
4. Data Management will review a PAGE and mark the PAGE as REV-DM.
5. Concurrently, Monitors will review a PAGE and mark the PAGE as REV-Mon.
6. Concurrently, Queries can be issued and closed by both the Monitor and DM.
Data REV-DM / REV-Mon + Queries Closed
After a PAGE is REV-DM AND REV-Mon AND there are no open queries,
7. Monitor can mark a PAGE as SDV.
Data Review
Follow the steps below to Mark Data as REV-Mon.
- Click into the visit to be reviewed.
- Please note that only Visits / Forms that have been marked SDR by a Coordinator can be marked as reviewed.
- The data entry page for the selected Subject’s Visit displays.
- Click the page REV / SDV access page action button on the left side of the data entry page.
- A menu displays with the following options:
- Mark Page as REV
- Mark multiple pages
- To mark the current data entry page as reviewed (REV), click the mark page as REV button.
- To mark multiple pages of the Visit as reviewed (REV), click the mark multiple pages button.
- A Page Status screen displays.
- Click on the plus (+) sign, located to the right of each SDR tag icon, to mark the page as REV.

- After all pages have been marked as reviewed, click the Save button, located on the top right side of the Page Status screen.

Mark Data as SDV
Follow the steps below to Mark Data as SDV.
- Click into a subject record that has already been reviewed by the Study Monitor and Data Manager.

- Click on the page REV / SDV access page action button. The following options display:
- Mark page as SDV
- Revoke page REV / MON
- Mark multiple pages
- To mark the current data entry page as SDV, click the mark page as SDV button.
- The screen will refresh and the SDV pie icon displays.

- To mark multiple pages of the Visit as SDV, click the mark multiple pages button.
- A Page Status dialog box displays.
- Click on the plus (+) signs of each REV icon to mark the pages as SDV.
- The Current Page Status updates to SDV.

- After all pages have been marked as required, click the Save button, located on the top right-hand side of the Page Status dialog box.
- If the entire Visit / Form has been marked as SDV, the SDV icon displays in the data entry page.


Fusion Tip! If the pages have already been reviewed by a Data Manager, then the Monitor can double-click on the plus (+) signs to mark the pages as SDV. Double-clicking is a faster way of marking the page straight from REV to SDV after the Monitor has reviewed the pages as well.

Issue a Query in Fusion
Refer to the steps for Pre-SDR Queries AND Post-SDR Queries below. Refer to Visit Status Icons and Definitions for visual reference and details about the icons.
Pre-SDR Queries
- Enter any visit or form that shows the “no data,” “partial data,” or “all mandatory data” entered symbol.
- Click on the applicable icon and enter the subject record or form.
- Click into the Visit / Form where you would like to issue a query.
- Click on the magnify glass icon, located to the right of the question on which you will issue a query. A new screen displays.
- On the left side of the window, click on the open new query page action button.
- Enter your query details.
- You have the option to type comments to the site in the Enter Comments box, or you may select a comment from the Drop-Down menu.
- After you have entered a comment, click on the save page action button.
- The query details window displays.
- Click the close button (page action).
- Your page will refresh, and the query icon will update to “new [icon]” for the site to respond.
- If you would like to add further comments, simply click on the “new [icon]”. Enter your comments for clarification and click the submit comments page action button.
Post-SDR Queries
- Click into the Visit / Form where you would like to issue a query.
- Please note that queries can only be issued on Visits / Forms which have been marked SDR by a Coordinator.
- Navigate to the question on which you will issue a query.
- Click on the magnifying glass icon located to the right of the question on which to issue a query. A new window displays.
- On the left side of the window, click the open new query (page action) button.
- Enter your query details.
- You have the option to type comments to the site in the Enter Comments box, or you may select a comment from the Drop-Down menu.
- After you have entered a comment, click on the save (page action) button.
- The query details screen displays.
- Click the close button.
- Your page will refresh, and the query icon will update to “new.”
