

Custom Views and Filters in Mentor CTMS Grids
Custom Views allow a permissioned user to personalize the display of a screen, by showing/hiding columns, rearranging column order, and adding Filter conditions that can be saved and accessed by one or multiple system users.
A Custom List View can be set to Personal View or Public View.
Personal View – created by a system user, this view is only available to the user that creates the view. Optionally, click the All Users check box (when adding or updating a View) to change a Custom/Personal View to a Public View.
Public/Shared Views – the Default View is available to permissioned system users. Use the menu above the grid to select any Public View options.
Scroll down for additional information about accessing and setting custom views.
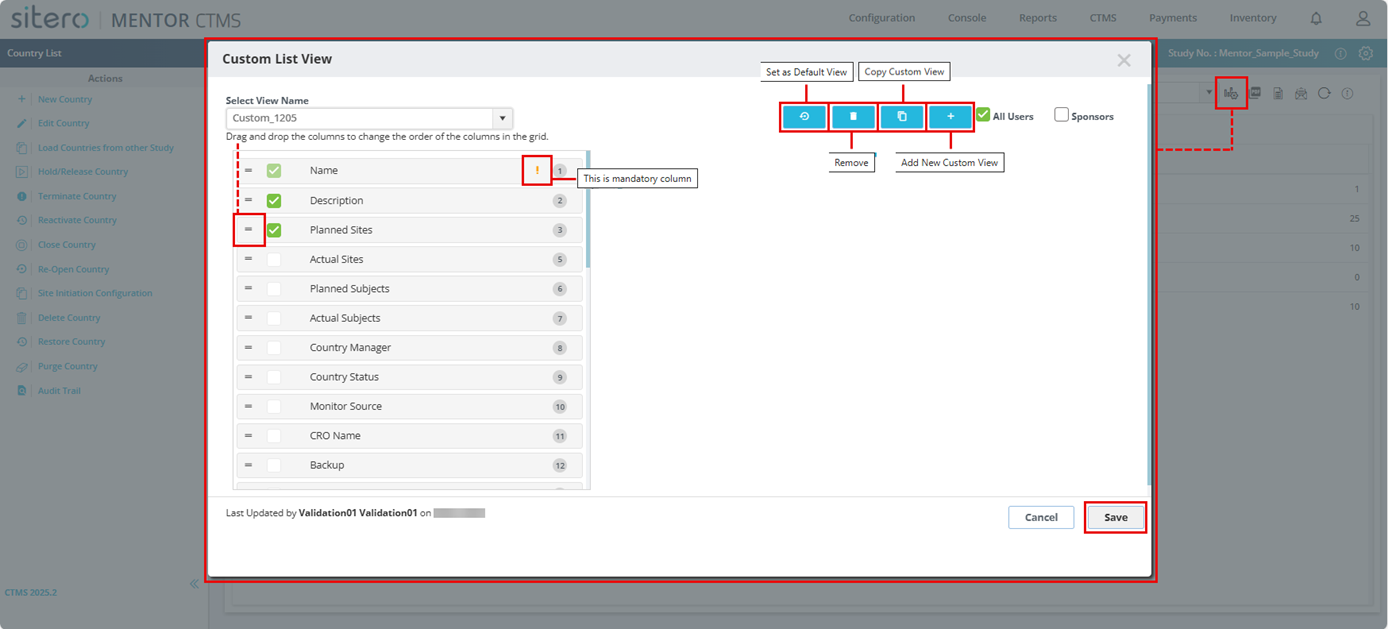

- Custom View options are available on most list screens (grids) in this system.
- Custom views can include:
- Default System Fields
- Extended Fields (Custom Fields in your Environment)
- Calculated Fields
- Use the options to create views as follows:
- Create a New View
- Copy a View (to use as a starting point to Create a New View)
- Add or Remove Columns from a View
- Reorder the Column Display
- Set as Personal Default View
- Remove a View – A custom View can only be removed by the User that created it.
- Set as Default View (Selected Settings display by default when you view the screen.)
- Make a Custom View Private or available to All Permissioned Users
- Include Multi-Conditional Filtering that can be saved for easy reference
Access Custom View Options
- Navigate to a List screen in the system.
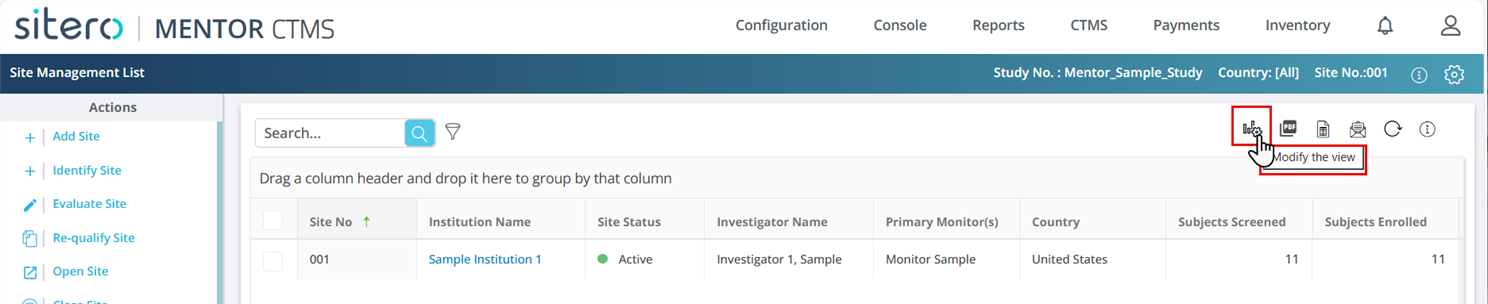
- Click the Modify View button, located above the grid to begin.
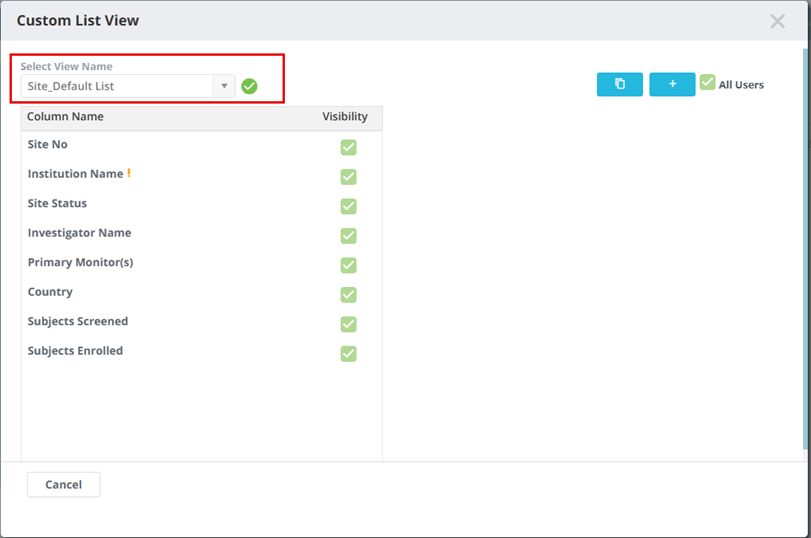
- The Custom List View dialog box displays.
- Hover over a menu or button to display onscreen details for the option.
- The standard view is available for all permissioned users of this system.

Add a New Custom View
- Navigate to a List screen in the system.
- Click the Modify View button, located above the grid to begin.
- The Custom List View dialog box displays.
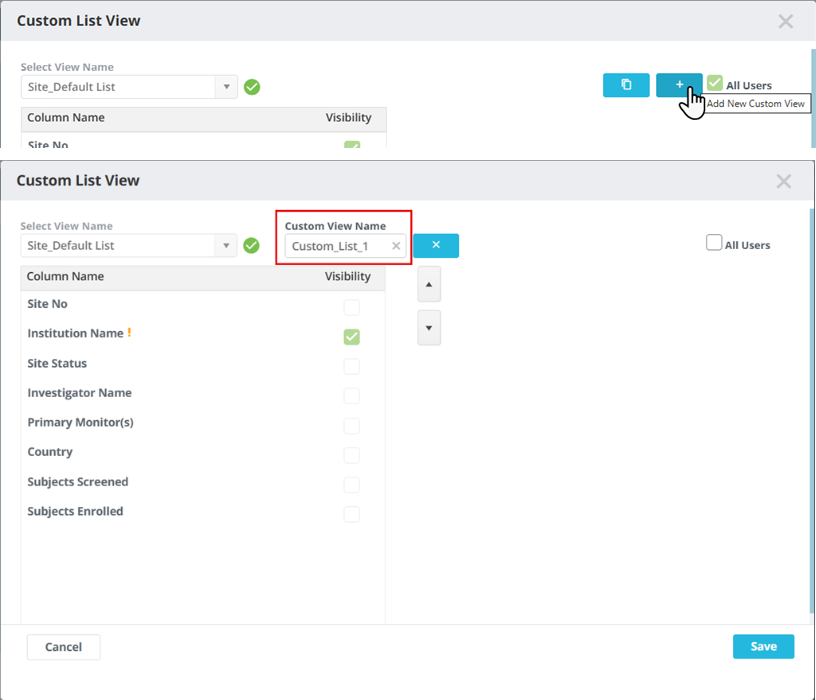
- Click the + (plus sign) button to begin.
- To create a new View from an existing Custom View record, scroll down to the Copy Custom View section.
- A Custom View Name field displays.
- Populate the field with the Name for the New Custom View.
- Optionally, click the small x (right side in field) to remove characters entered in the field.
- Optionally, click the x button (outside, right of the field) to dismiss the field without saving a new List View.
- Mandatory columns (display a symbol) are selected by default and cannot be removed from the List View.
- Select other columns to display in the View.
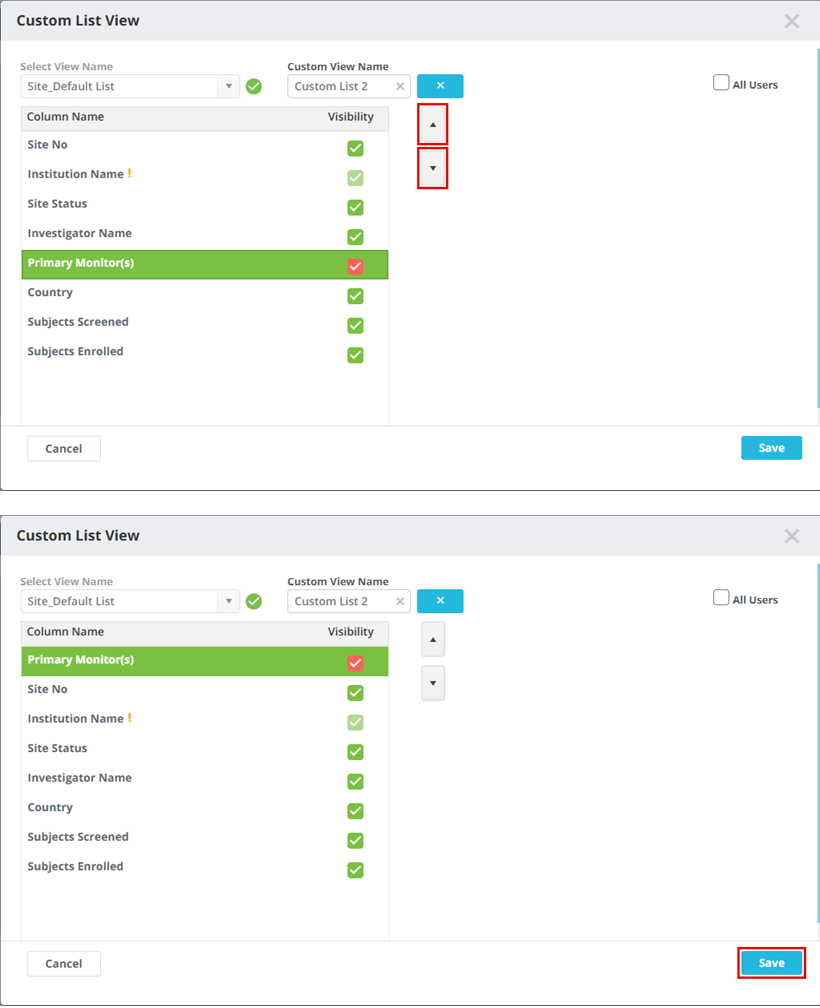
- Optionally, you can move any/all Column Name options up or down in the list to change the location of the columns in the grid that displays on your CTMS screens.
- This change can be made during the Add and Edit Custom View process.
Copy Custom View
Use the Copy Custom View feature to create a new View from the default or any existing View.
- Navigate to a List screen in the system.
- Click the Modify View button, located above the grid to begin.
- The Custom List View dialog box displays.
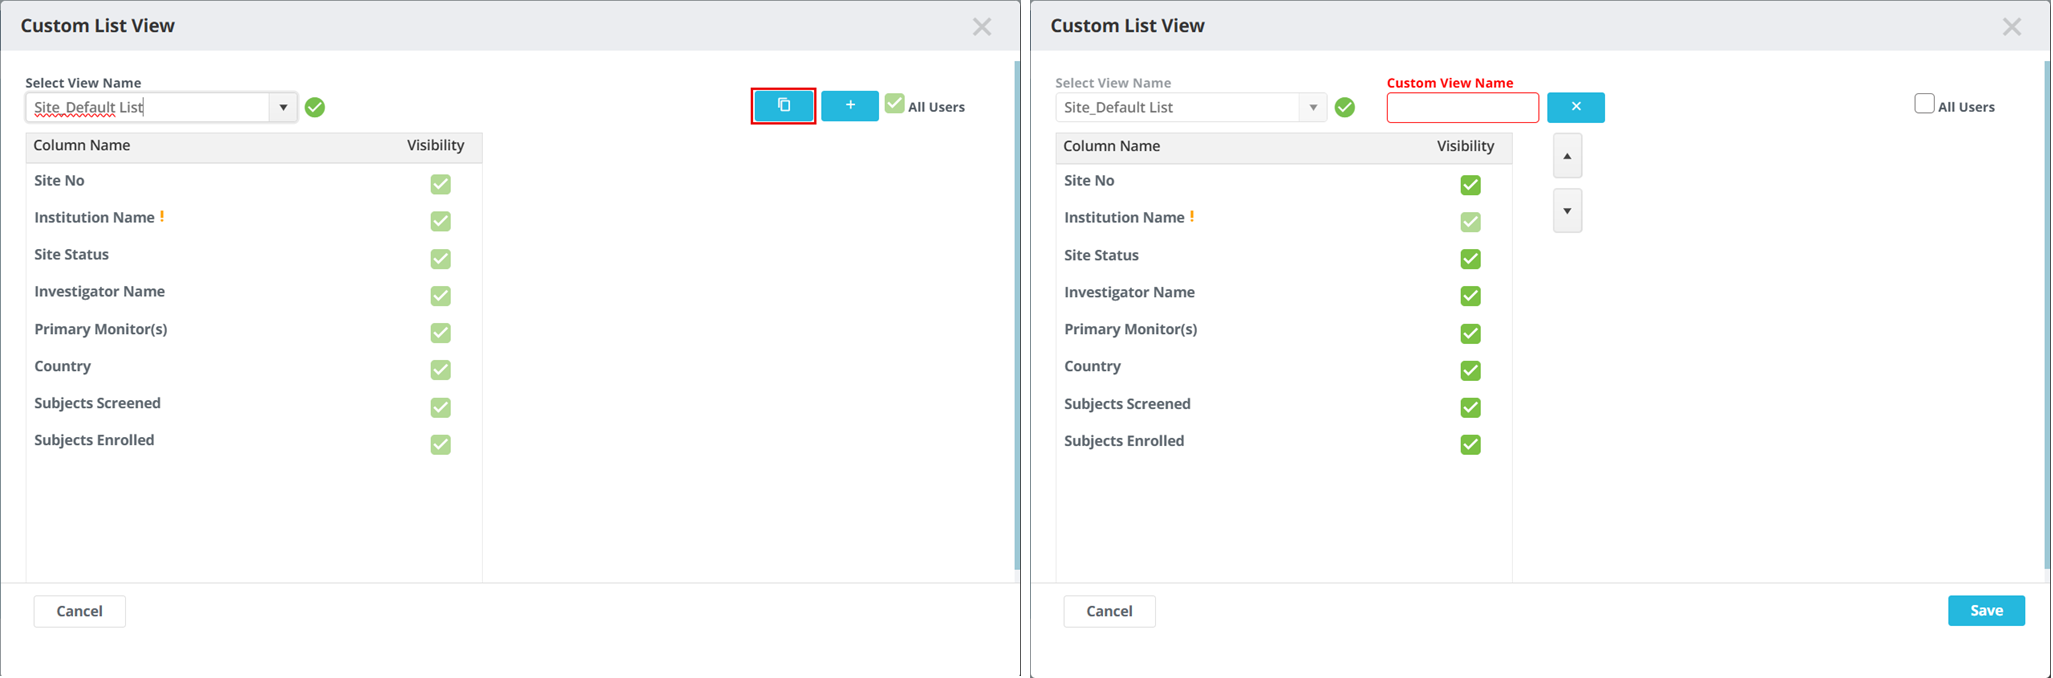
- Click to open the Select View Name menu and click a record to select a View.
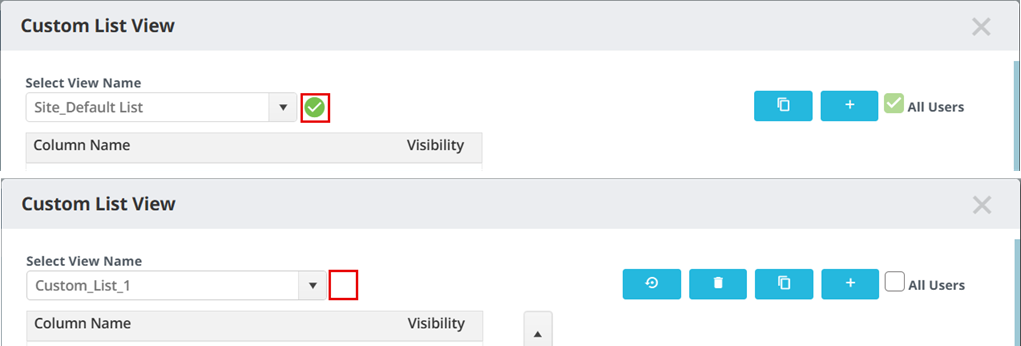
- A symbol displays to the right side of the Default View Name.
- Click the Copy Custom View button.
- Enter characters in the Custom View Name field.
- Click in check boxes (Visibility column) to include options in the View; optionally, click on check marks to deselect fields to omit them from the View.
- Click the Save button to complete the process.
Select a View
Use the menu above the grid to toggle between all views available for the screen.

Set as Default View
Follow the steps below and the grid displays your selected view each time you return to this screen, even after you log out and log back in.
- Navigate to a screen in the system.
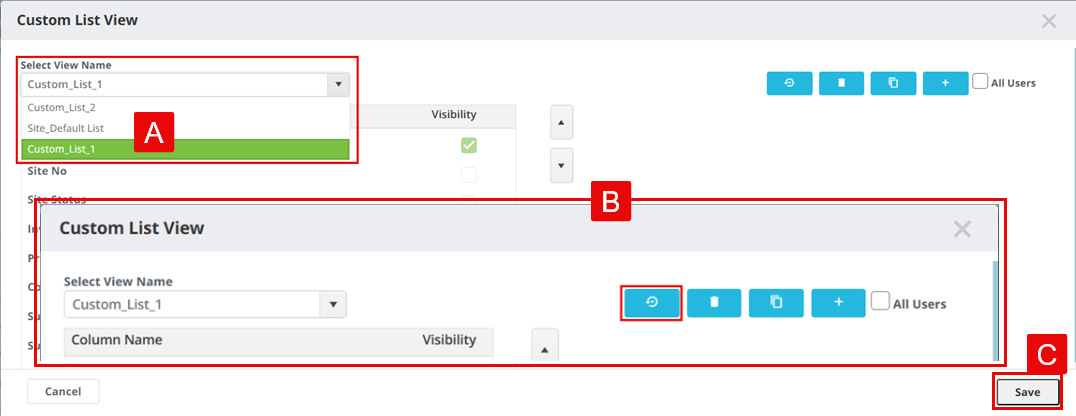
- Click the Modify View button, located above the grid to display the Custom List View dialog box.
- Use the menu above the grid to select a View option.
- Click the Set as Default View button (left side of the delete button).
- Optionally, click in the All Users check box to allow any permissioned user to access this view OR click on the check mark to make the view private, accessible only to you.
Delete a View
A permissioned user may delete a view they created.
The System Default View setting cannot be removed.
- Navigate to a screen in the system.
- Click the Modify View button, located above the grid; the Custom List View options display.
- Select an option from the Select View Name menu.
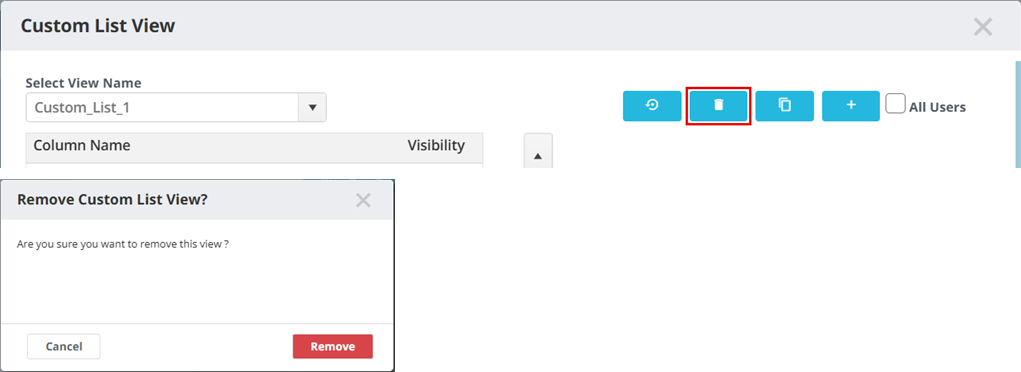
- Click the Delete button (trashcan symbol).
- A dialog box allows you to confirm or cancel the action.
- Click the Remove button to complete the process and remove the record.
Reorder Column Display
- Navigate to a screen in the system.
- Click the Modify View button, located above the grid; the Custom List View options display.
- Select an option from the Select View Name menu.
- To move Column Name fields up or down, click on the field and use the up and down arrows (right side of Visibility column) to move one column at a time. Repeat as needed.
- Click the Save button to retain the setting.
- The top to bottom order you set now displays the columns from left (top) to right (bottom).
Multi-Conditional Filtering
- Drag and drop one or multiple column headers to the filter row (located between Search field and column header) to display ONLY records that match the selections in the grid.
- You may add multiple filters.
- Click the Save button (next to the View Selection drop-down field) to retain the settings.
- Settings in this menu are available to all permissioned users in this system.
- Click to open the menu and click on an option to select a view.

