Administration in Mentor Payments
The system provides features and functions for the following Administration options:
- Administrative Password Reset
- Create a Single-Sign-On / Corporate User
- Create Roles
- Manage AP Configuration
- Password Requirements
- Create and Manage Users
- Deactivate a User
- Reactivate a Deactivated User
Create and Manage Roles
- In the system, each User must have at least one (1) Role associated with their user account.
- Roles are used to define the Permissions that allow access to specific features.
- Permissions may be assigned, changed, and deleted from Roles.
- Each Role may be assigned to multiple users, as well as multiple Roles may be assigned to the Users.
- After a Role has been created in the system, it cannot be deleted. However, you may still modify the Role and the Permissions connected to it.
Create a New Role
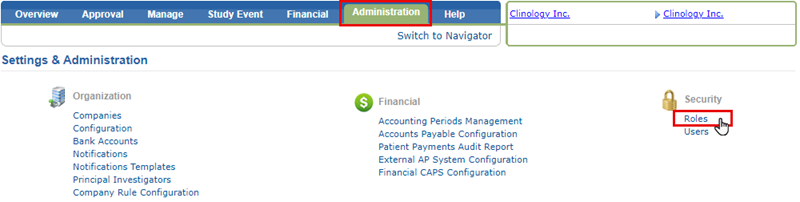
- Click to select the Administration tab.
- Click to select the Roles link (Security column).
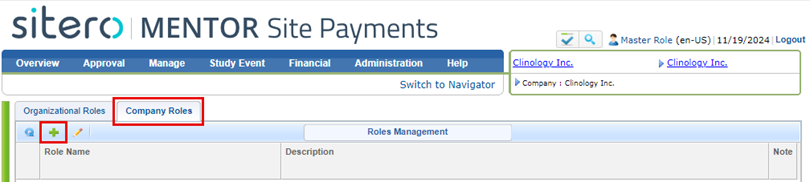
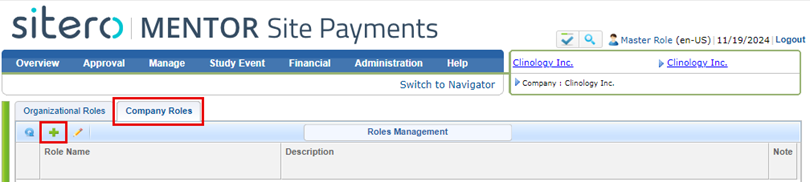
- The Roles Management screen displays a grid on the Company Roles tab.
- Click the add button (green plus sign).
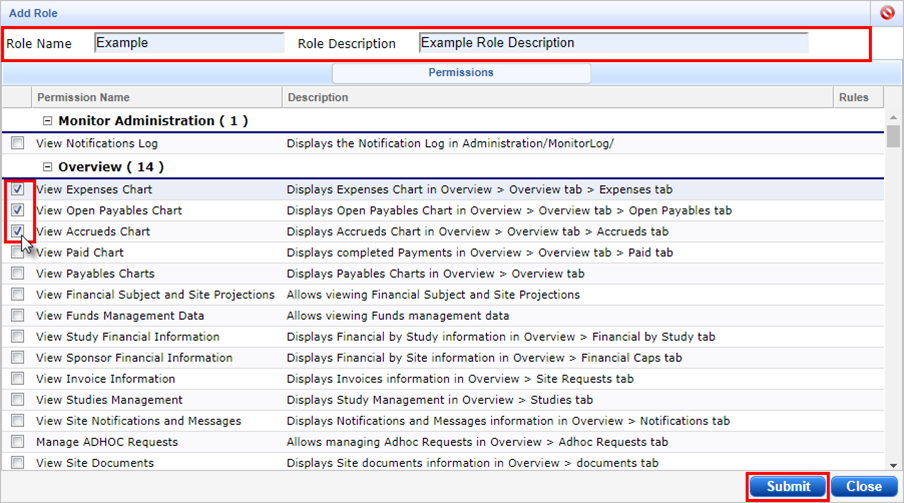
- The Add Role dialog box displays.
- Enter the Role Name and Role Description.
- Role Names and Descriptions cannot contain special characters.
- Click in a check box to select the required permissions for the role.
- Remember! If this role is intended to be used to Approve Payment Batches, refer to the Adding Permission to Approve Payment Batches section (below) for further instructions on how to add that permission to the role.
- Click the Submit button to complete the process.
Adding Permission to Approve Payment Batches
- When adding the Approve Payment Batch permission to a Role, the AP Approval permission for that specific role must be defined.
- A permissioned user may add that permission at the time the role is created or via the edit process.
- This action makes that role available for use in the Accounts Payable Configuration for payment batch approvals.
- IMPORTANT NOTE: Configuring AP Payment Approvals permissions on the role level does not automatically add the role as one of the authorized approvers of a payment batch.
- Accounts Payable Configuration for authorized approvers must be configured separately and prior to approving a payment batch.
- Click to select the Administration tab.
- Click to select the Roles link (Security column).
- The Roles Management grid displays.
- Click to select the Company Roles tab.
- Click the add button (green plus sign).
- The Add Role dialog box displays.
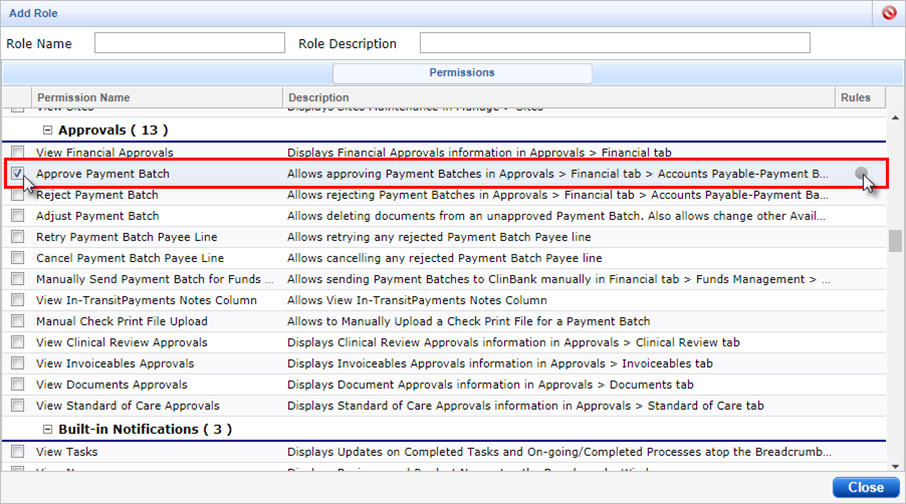
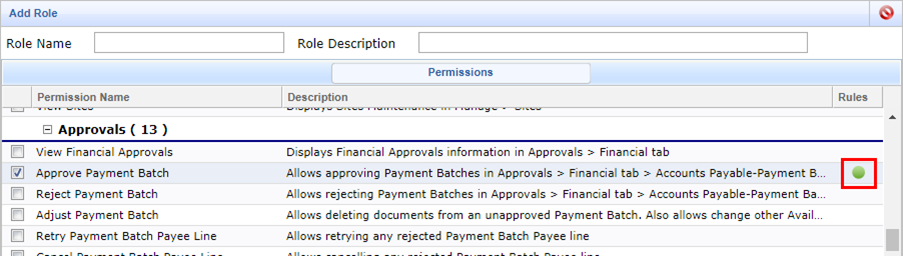
- Scroll down to the Approvals Permissions.
- Click in the check box to select the “Approve Payment Batch” option.
- Click the gray sphere (icon) that displays in the Rules column.
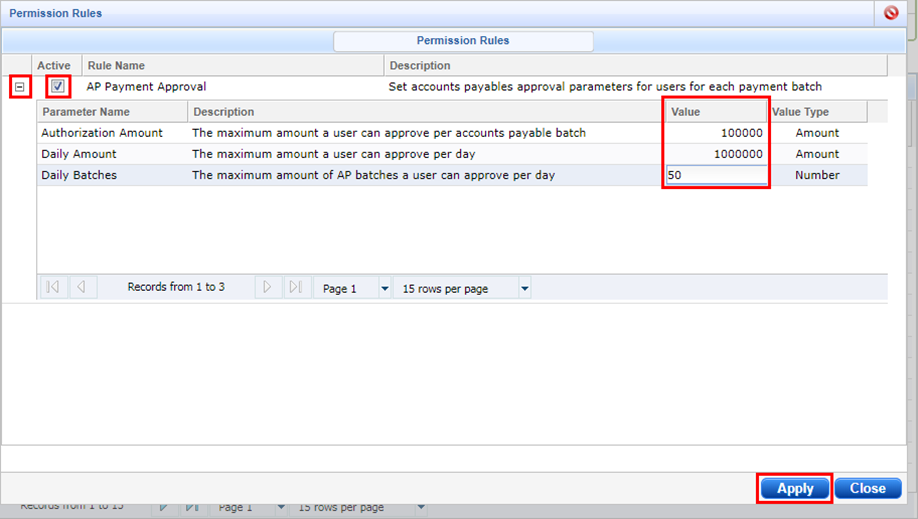
- The Permission Rules dialog box displays.
- To activate the Approve Payment Batch permission, the permission rules section must be completed.
- Click the plus sign (in small box, far left column) in the AP Payment Approval permission row to expand the details in the grid.
- Click in the check box to select the AP Payment Approval configuration.
- Click in the Value column for each row to open the field.
- Enter the currency parameter for each row, including Authorization Amount, Daily Amount, and Daily Batches.
- Click the Apply button to complete the process.
- Verify that the sphere on the Rules column (right side of grid) is green, indicating approval configuration is successful.
- Optionally, configure additional permissions, as required.

Create and Manage Users
- A permissioned user creates and updates User records in the Administration tab section of this system.
- Remember: When you initially create the user account, they will not have the ability to perform actions in this system until you add Roles(s), that include Companies and Studies, to the User record.
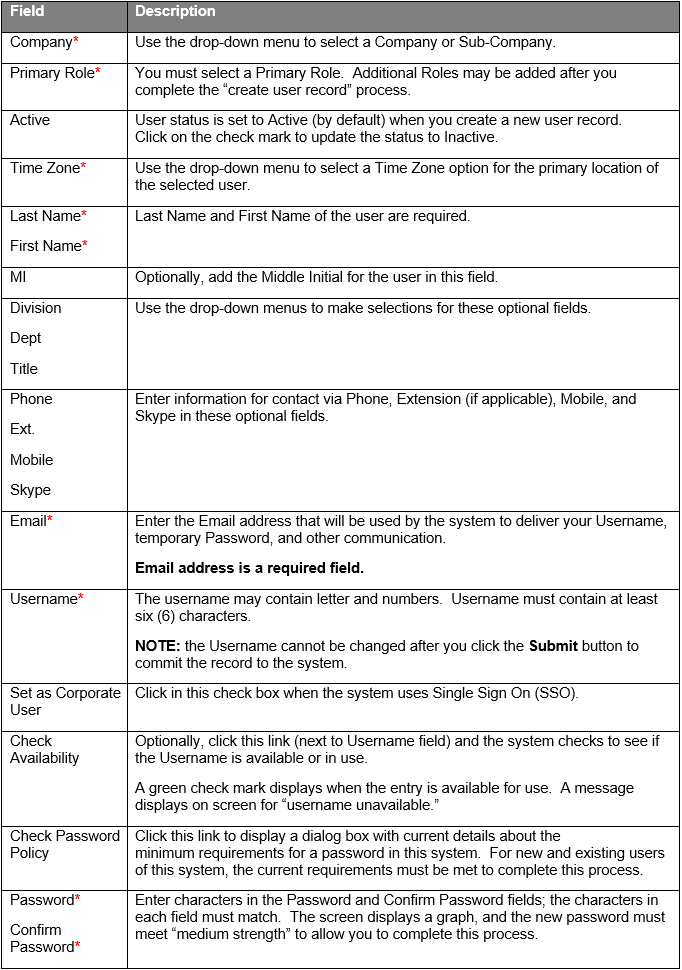
- Refer to the table below for information about the configuration options for adding and editing a User record.
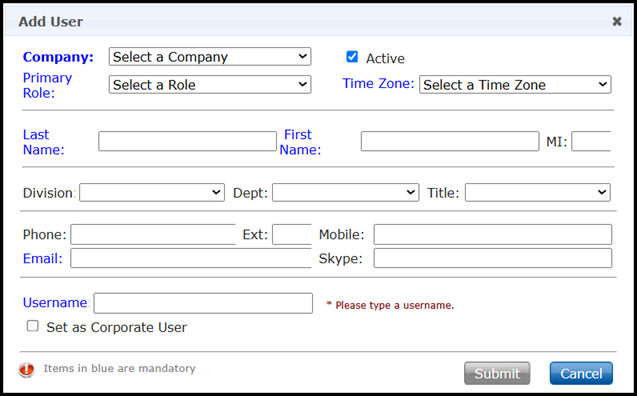
In the system, required fields display Blue text for field name; in the table, a red asterisk (*) denotes a required field.
Create a User Record
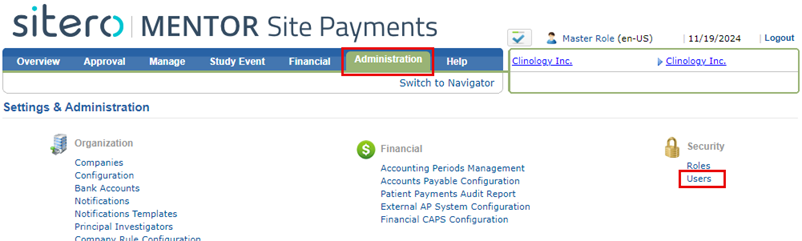
- Click to select the Administration tab.
- Click to select the Users link (Security column).
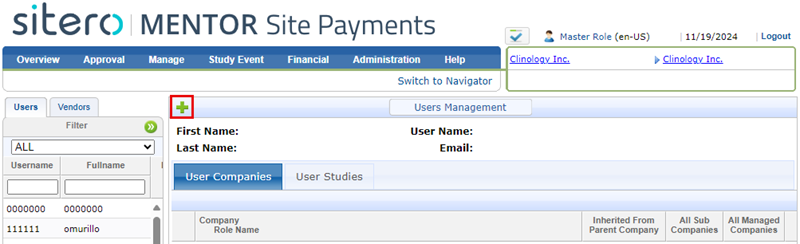
- Click to select the User Companies tab (above the grid on the main screen).
- Click the green plus sign in the Users Management tile to initiate the Add process.
- The Add User dialog box displays.
- Populate information in required and optional fields.
- Refer to the table above for details about the fields and options.
- Optionally, click in the check box to “Set as a Corporate User.”
- Apply this setting when the organization uses Single Sign On (SSO).
- Click the Submit button.
- The new user record is added to the environment.
- The dialog box automatically closes.
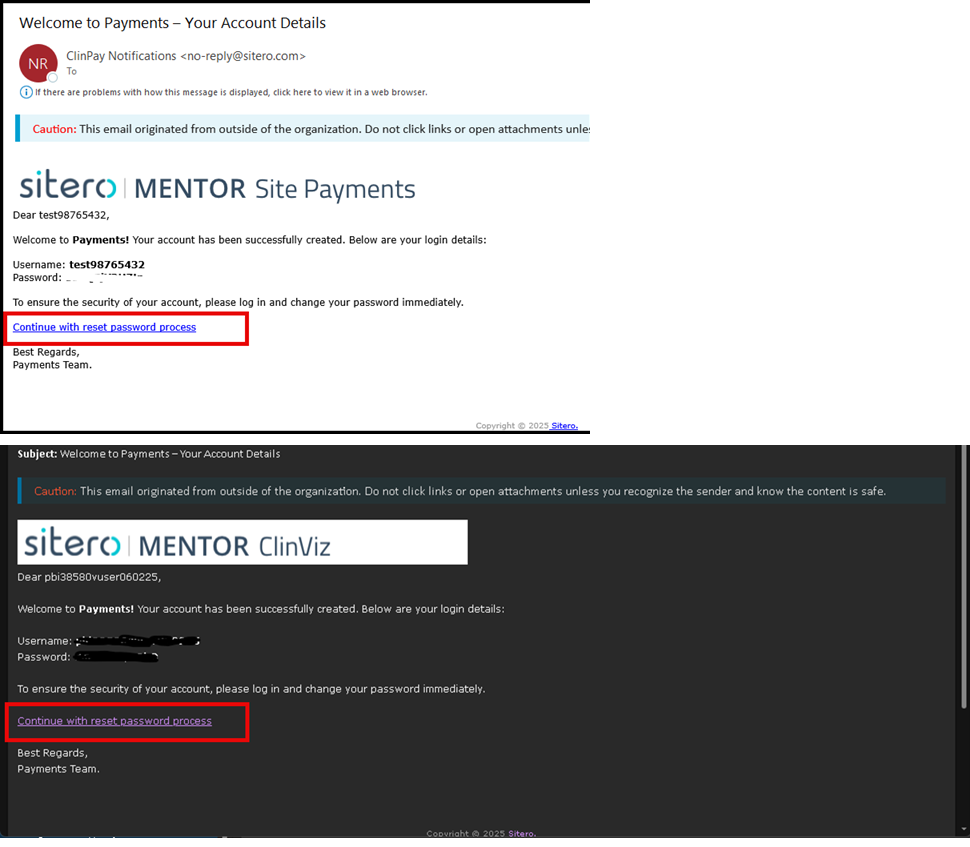
- A “Welcome” email is sent to the email address entered.
- Email includes Username and a temporary password.
- The Email prompts the new user to log in and update the password.
- The email is sent from an unmonitored inbox. Do not reply to this email; contact your Project Manager with questions or if you require additional information.
- Refer to the Locate User Record section (below) to access the new record and continue configuring options (i.e., add studies, roles) for the user.
Locate a User Record
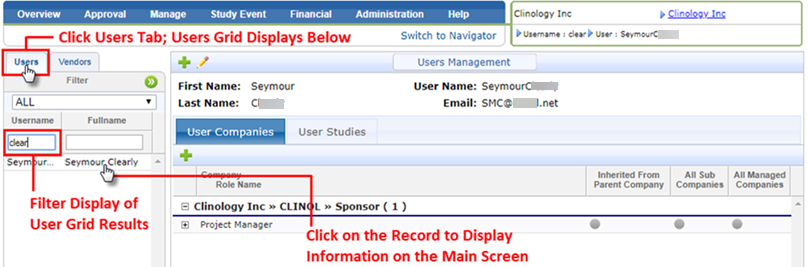
- When many User records are available, use the search fields in the Users grid to narrow the display of results.
- Click on the row, and details for your selection display on the main screen.
Edit User Record Details
- When you Edit any existing User Record, an email address MUST BE added.
- Password may be updated as needed.
- Locate and click on a User record.
- Details for the selection display in the grid on the main screen.
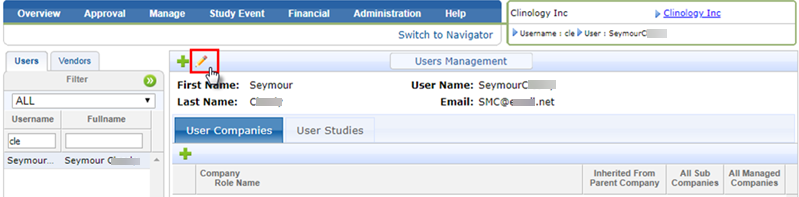
- Click the pencil button to initiate the edit process.
- The Edit user dialog box displays.
- Update information in fields, as required.
- The Username cannot be changed.
- Click the Submit button to complete the process.
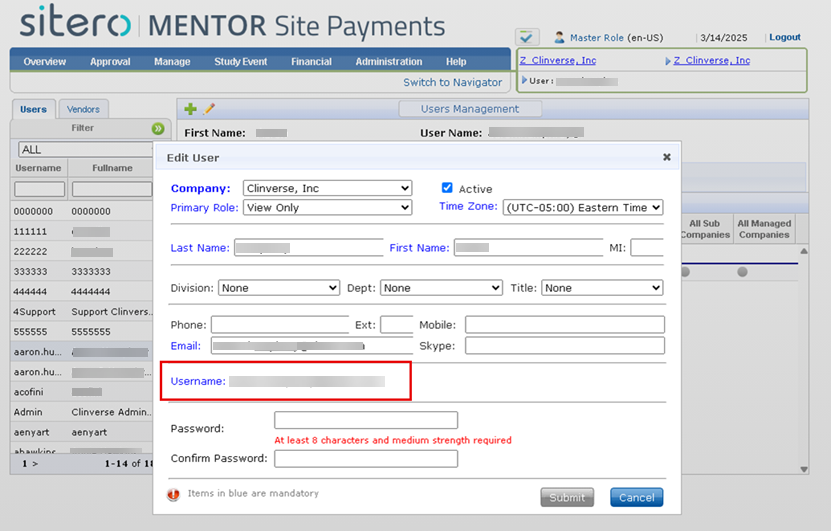
User Companies (Tab)
- The User Companies tab may be selected by default when you select the Administration category.
- Use the features and functions on this screen to add or update system access (via Roles and Permissions) for the selected user.
- You may add or remove Companies and Roles to which the record is associated.
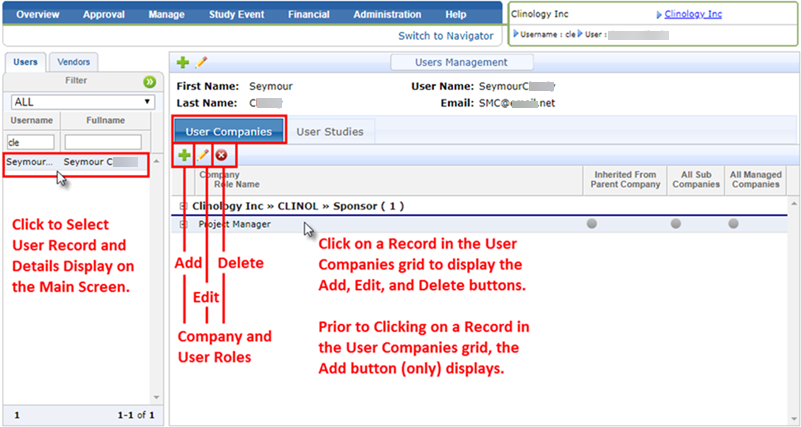
Add Company and Role to User Record
- Click to select the Administration tab.
- Click to select the Users link (Security column).
- Click to select the User Companies tab (above the grid on the main screen).
- Locate and click on a User record.
- Details for the selection display in the grid on the main screen.
- Click the green plus button (to initiate the add process), located above the User Companies grid.
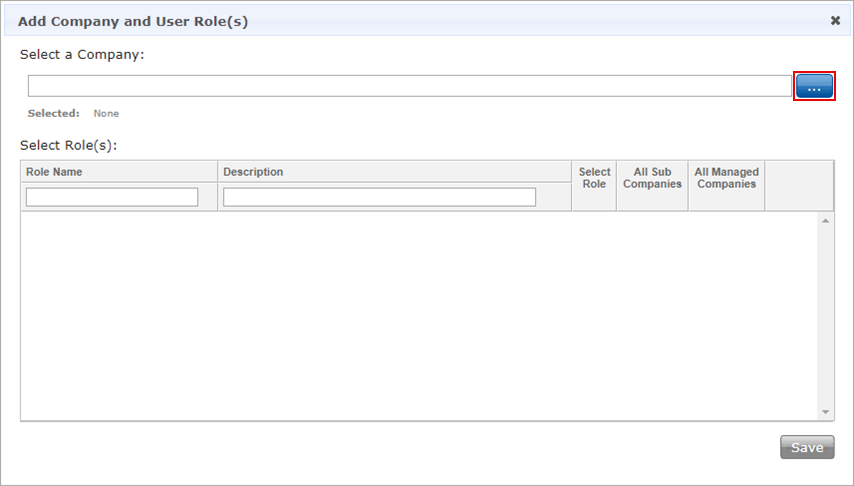
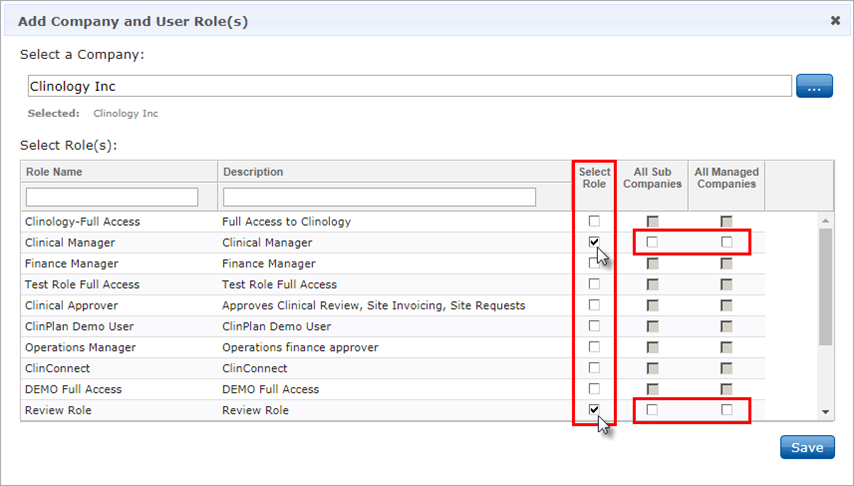
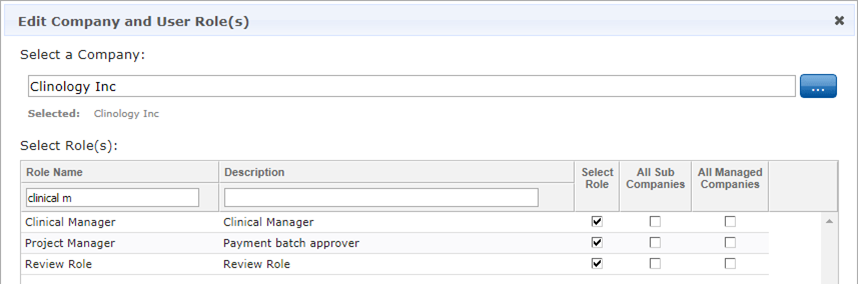
- The Add Company and User Role(s) dialog box displays.
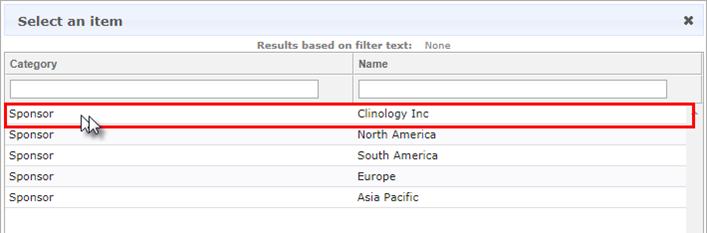
- Click the blue bar with 3 dots button (display options) to display a list of company and sub company records.
- Double-click on an option to make a selection.
- The Select Role(s) grid displays options based on your Company selection.
- Click in the check box in the Select Role column to assign roles to the user record.
- After selecting a role, the check boxes in the All Sub-companies and All Managed Companies columns become available.
- Optionally, click in additional check boxes to grant access.
- All sub-companies – select this option to give the user access to all sub-companies of the selected company.
- If the user account was created under a sub-company that has other nested companies, the user only gains access to the sub-company and its nested companies, but not to the parent company.
- All managed companies – While this column displays, Sitero recommends that you do not use this option.
- Click the Save button to complete the process.
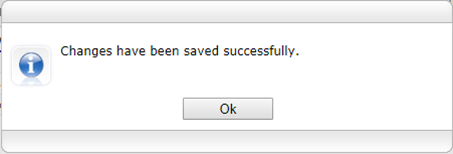
- An onscreen message displays.
Edit Roles and Associations for the User Record
Follow the steps below to Edit or Remove Associations of the User record.
- Click to select the Administration tab.
- Click to select the Users link (Security column).
- Click to select the User Companies tab (above the grid on the main screen).
- Locate and click on a User record. Details for the selection display in the grid on the main screen.
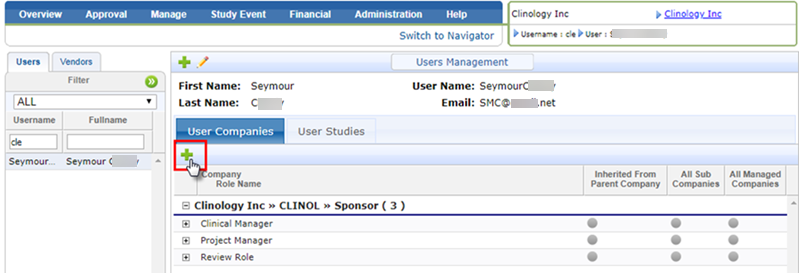
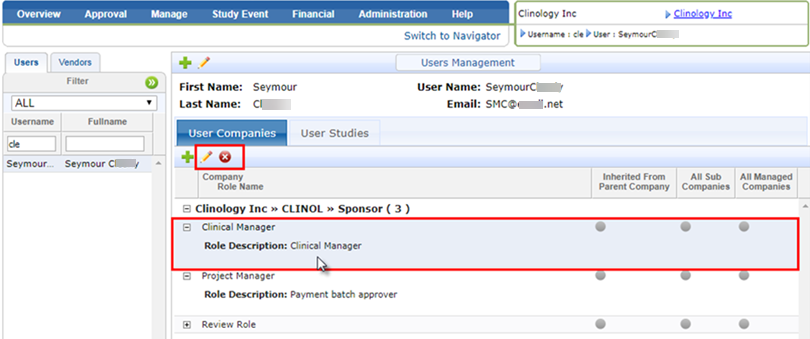
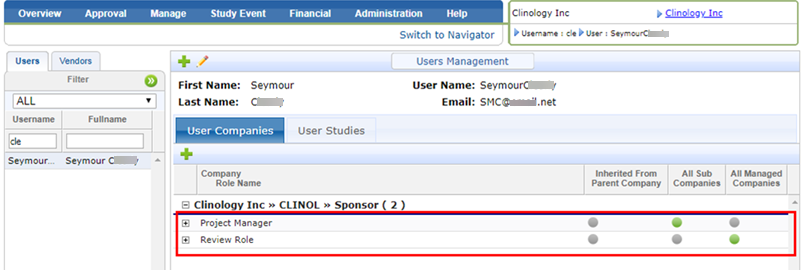
- Notice the gray buttons that display in the columns (see example below).
- Gray buttons indicate permission is NOT assigned.
- Green buttons indicate that the User has access at the level shown in the grid (refer to figures below for visual reference).
- Click on a Role (row) of the grid.
- The Edit (pencil) and Delete (“x” in red circle) buttons display above the grid.
- Click the Edit button (pencil).
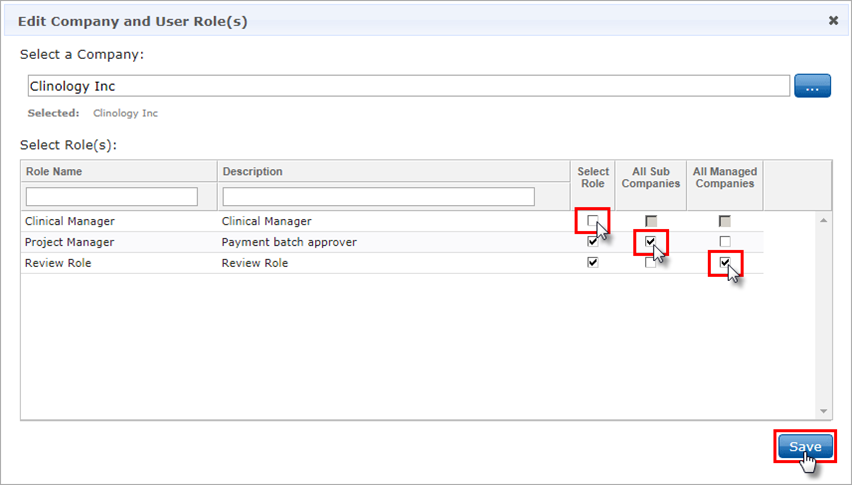
- The Edit Company and User Role(s) dialog box displays.
- Click on a check mark in the Select Role column to REMOVE the Role from the User record.
- Click in a check box to ADD Role access for All Sub Companies and/or All Managed Companies to the User record.
- Click on a check mark in the All Sub Companies and/or All Managed Companies to remove the User’s access to those screens while retaining Role access at the company level.
- Click the Save button.
- An on-screen message displays. Click the Ok button to dismiss the message.
- The grid updates to display current settings.
Remove Role from User Record
Follow the steps below to remove a Role from a User Record.
Remember: You may also remove a Role from a User Record on the Edit Roles screen, scroll up to the “Edit Roles and Associations” details to review the process.
- Click to select the Administration tab.
- Click to select the Users link (Security column).
- Click to select the User Companies tab (above the grid on the main screen).
- Locate and click on a User record. Details for the selection display in the grid (main screen).
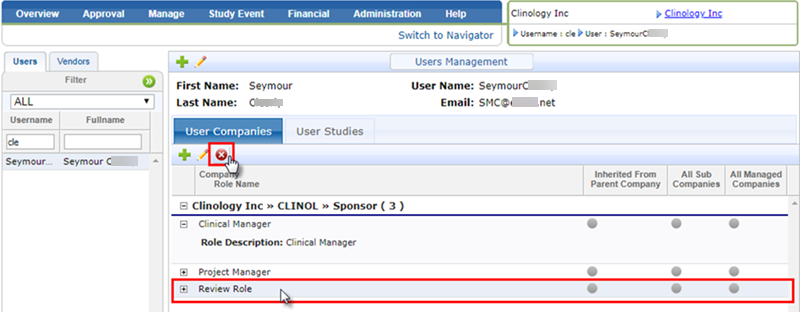
- Click on a Role in the grid.
- Click the remove button (“x” in red circle), located above the grid.
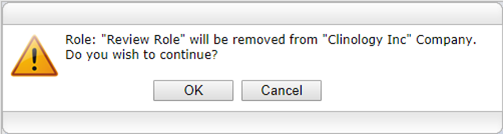
- An on-screen message displays.
- Click the OK button to remove the role from the User record.
- Optionally, click the Cancel button to leave the User/Role association.
User Studies (Tab)
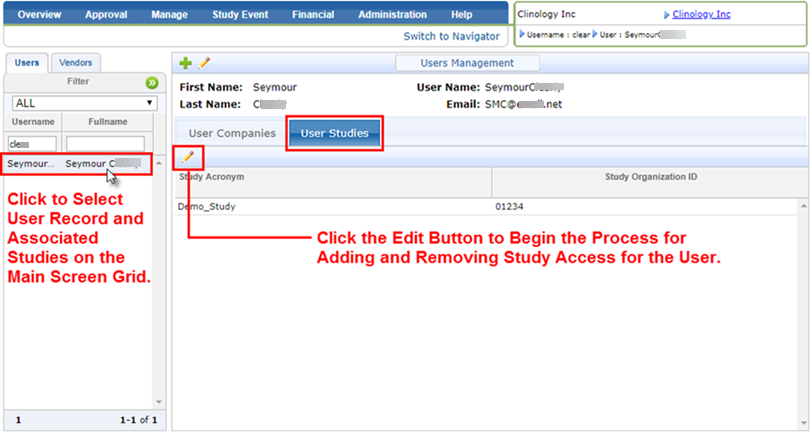
- Use the feature and functions on this screen to include access to studies via roles.
- By default, the User Record cannot access any Study until access is granted.
Add Study Access to User Record
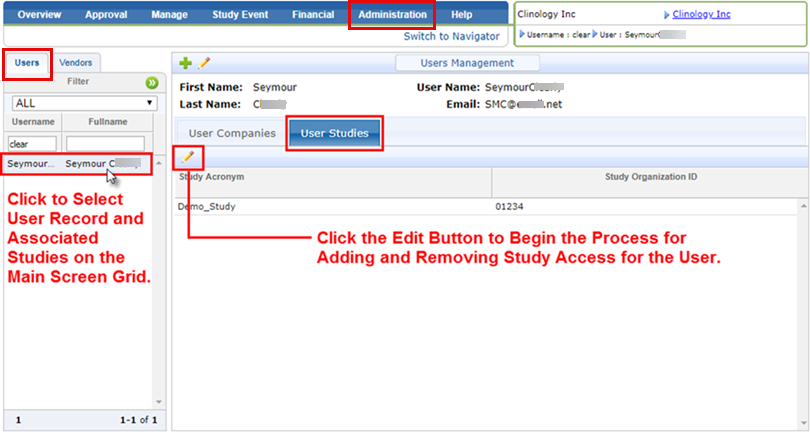
- Click to select the Administration tab.
- Click to select the Users link (Security column).
- Click to select the User Studies tab (above the grid on the main screen).
- Locate and click on a User record.
- Details for the selection display in the grid on the main screen.
- Click the edit button (pencil), located above the User Studies grid.
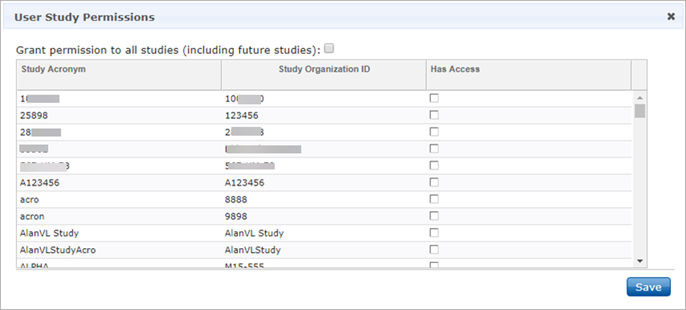
- The User Study Permissions dialog box displays.
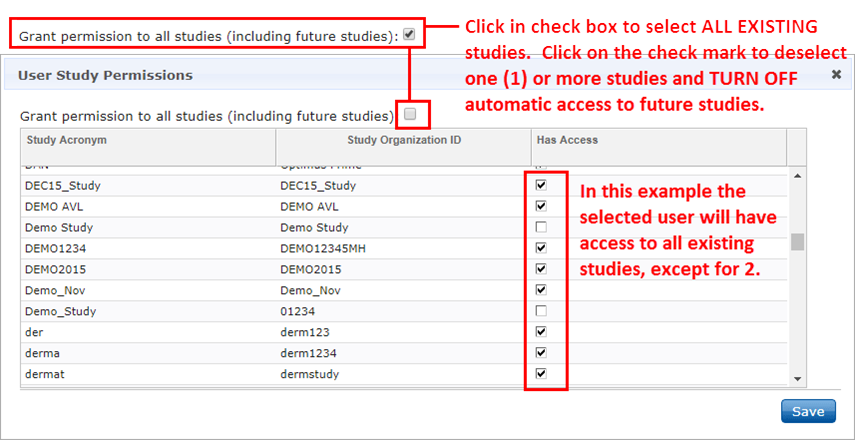
- Click in a check box in the Has Access column to grant access to the selected Studies.
- You must click in the check box for each study to which access will be granted.
- To provide a User with access to future studies automatically when those studies are added to the system, click in the check box above the grid to “Grant permission to all studies (including future studies)”.
- Note the following optional features that are available after making this selection:
- Click on the check mark (to the right of Grant permission…) and then click on check marks in the “Has Access” column to REMOVE access to one (1) or more studies. The user will not be automatically added to new studies, but may be manually added when applicable.
- Click on the check mark (Grant permission…) to grant access to all current studies but remove automatic inclusion in future studies.
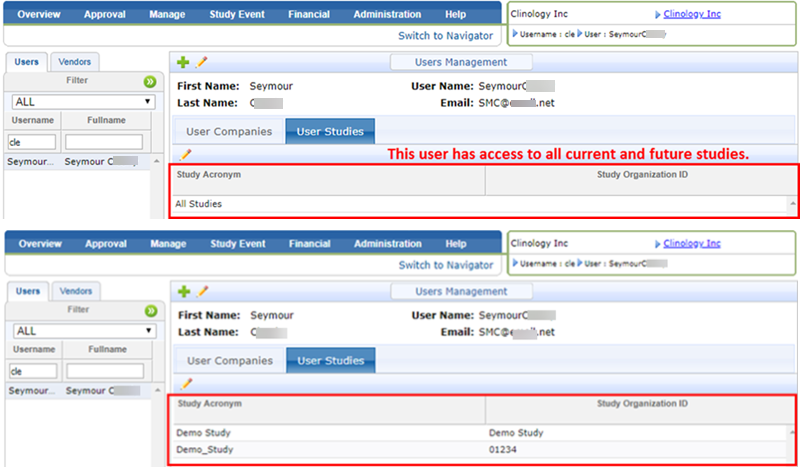
- Click the Save button to complete the process.
- The Study grid updates to display Studies to which the user has access.
Accounts Payable Configuration
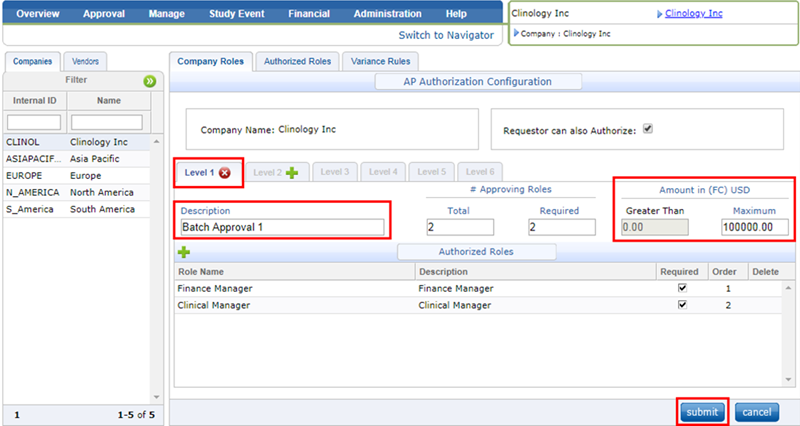
Use this feature to specify settings for Accounts Payable (AP) Authorization Configuration including Roles that may approve payment batches and payment amount limits.
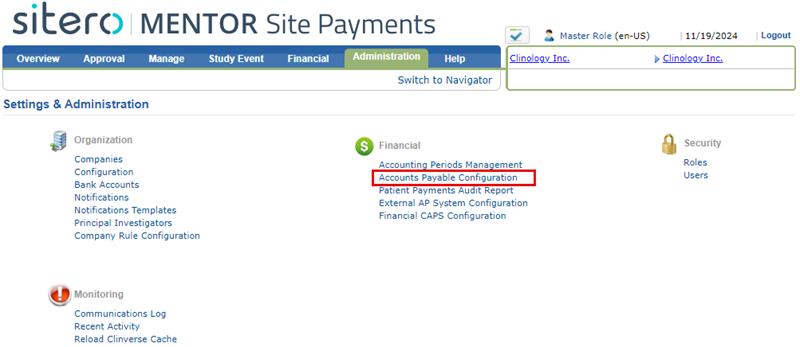
- Click to select the Administration tab.
- Click to select the Accounts Payable Configuration link (Financial column).
- Click the add button (green plus sign), located on the right side of a tab, to initiate the process for adding rules for the AP Authorization Configuration.
- Click the remove button (“x” in red circle), located on the right side of a tab, to remove an AP Authorization Configuration setting. The configuration for the selected level is deleted, no confirmation message displays.
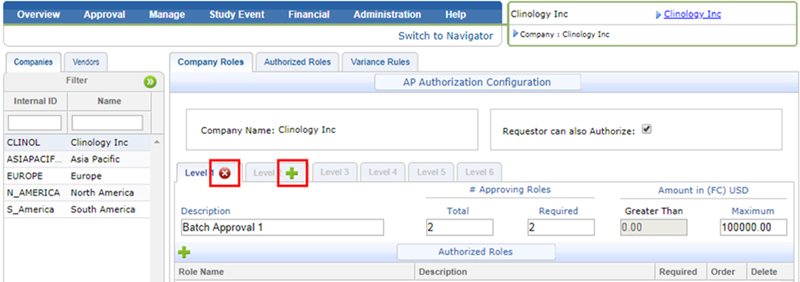
The following table describes the fields and options that display on the AP Authorization Configuration screen.
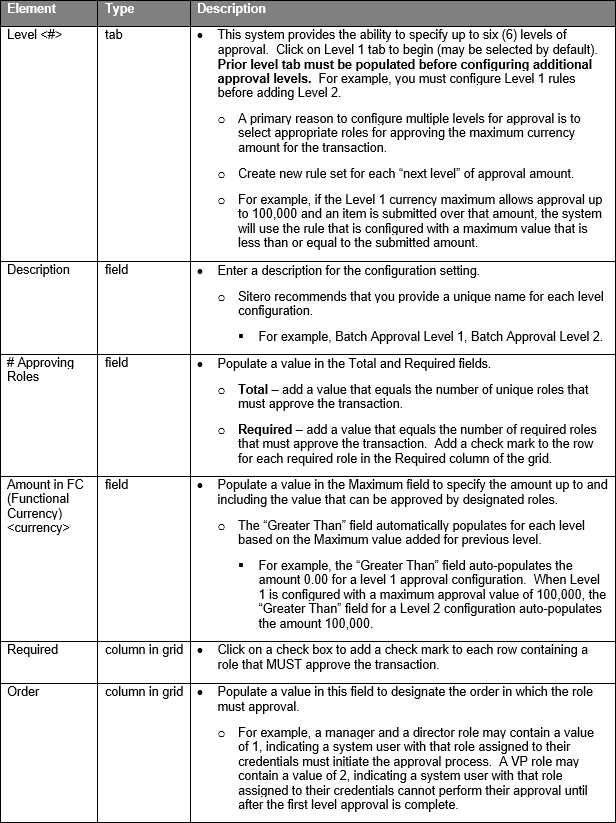
Accounts Payable Authorization Configuration
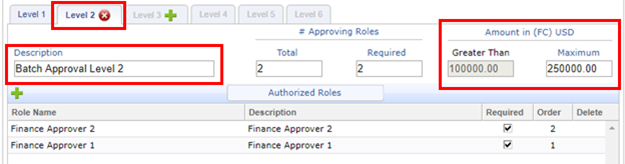
Follow the steps below to configure settings for an approval level. When multiple approval levels are required, repeat the steps below to configure the next Level.
- Click the add button (green plus sign) for the Level <#> tab to begin.
- Enter information in the description field.
- For best results, enter a unique description for each approval level configuration.
- Enter information in the Total and Required field for the “# Approving Roles” category.
- If there is a value in the Required field, you must have at least one role selected with a check mark in the required column of the grid.
- Total – grand total of roles (not users) that must approve a batch for it to become fully approved.
- A minimum of one (1) approval is required.
- Required – value must correspond to selections made in the Required column of the grid.
- Low value may be zero (0).
- High value may be less than or equal to total number of approving roles.
- Enter a value in the Maximum field for the “Amount in FC [currency]” category.
- The Greater Than field automatically populates based on prior level maximum setting value.
- Click the add button (green plus sign) in the Authorized Roles tile to select roles.
- The grid updates to display your selections.
- Click in a check box for each role that is a Required approver.
- Optionally, enter a value in the Order column for the row.
- For example, a system user with a role listed as 1 in the order column must approve the batch prior to a system user with a role listed as 2 submitting their approval.
- If approval order is not critical, all order values may be set to 1 (automatically populated by the system).
- Click the Submit button to complete the process.