Data Upload in Mentor Payments
The process of uploading data from EDC into the system is one of the defining features of this application. With this data, the system can quickly and accurately determine the vendors who are eligible for payments and present these transactions for review and approval.
The following information is covered in this article:
- Study Event Overview
- Uploading Data Configuration Options
- Uploading Data Process
- Running CML
Remember: Managing data feeds is a critical and powerful function. If data is not uploaded correctly, a study could be irretrievably affected. Please contact your project manager or email support@Sitero.com for additional information, assistance, and answers to any questions.
Study Event Overview
- Study events must be unique.
- If multiple instances of the same study event are imported, the study events past the first will be marked as “quarantined” and will not be evaluated by the CML engine.
- If needed, the “Index” field may be used to differentiate between multiple instances of the data study event.
- For example, for different instances of the submission of the Adverse Events CRF to coincide with multiple unscheduled visits.
- EDC data is imported into this system in the form of study events.
- A study event is one data point for one subject with a date.
- For example, a record of a visit occurring, procedure being completed, or CRF being validated could be an example of a study event. A study, site or subject status could also be a study event.
Navigate to: Study Event > Data.
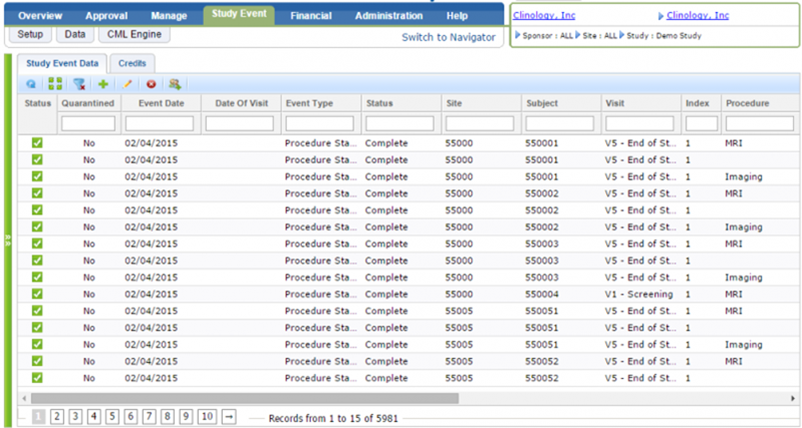
- Due to the large volume of EDC data that may be presented, we recommend using the filter function to identify the data points for review.
- In the status column, category events are color coded as follows:
- A light green box with a check mark indicates an evaluated study event.
- A dark green box with a check mark indicates an imported study event.
- A yellow box with a check mark indicates a quarantined study event.
- Hover your mouse over the check box to display on-screen information (text refence) about the status.
- Study events may be added, edited and deleted from this screen. This is not recommended because of the ease in which manual errors may occur and affect payments.
Study Events and CMLs
Navigate to Study Event > Data in this system to view Study Events.
- Study Events are the data that CMLs review to determine if a transaction should be created in the system.
- EDC data is imported into this system in the form of study events.
- A study event is one data point for one subject with a date.
- For example, a record of a visit occurring, procedure being completed, or CRF being validated could be an example of a study event. A study, site or subject status could also be a study event.
Uploading Data Configuration Options
Remember: Due to the possibility of making major changes to a study, if you have questions about a data feed that has a larger than expected numbers of deletions, voids, or updates, please contact support@Sitero.com for assistance. Our representatives may not be able to tell you what the root cause of the problem is but may be able to suggest steps to identify the differences and suggestions for a process to determine the next step.
- There are several options allowed when uploading data manually to the system.
- These options include Transactional vs Snapshot mode, automation triggers, and study event verification parameters.
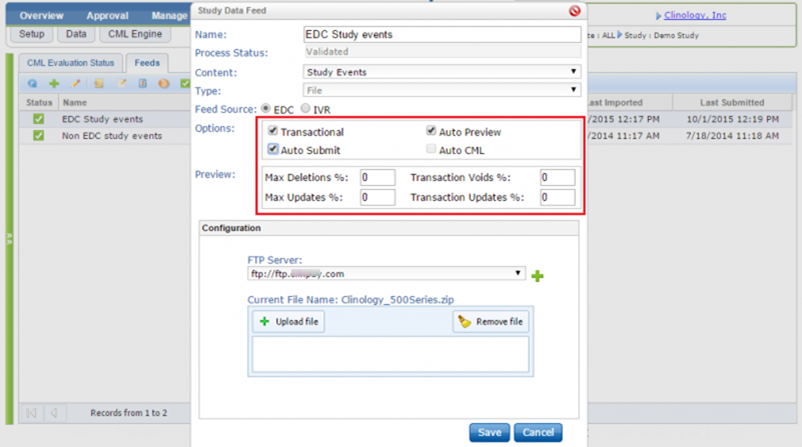
- All of the following options are available in the Study Data Feed window, accessible by navigating to Study Event > CML Engine > Feeds, selecting a feed, and clicking the Edit button.
Transactional vs Snapshot
- The “Transactional” check box determines whether the file will be run in transactional or snapshot mode.
- In either mode, study events are compared to existing study events from that data feed to determine what study events are new, what study events have been updated, and what study events have been deleted in the new file.
- In “Transactional” mode, study events will not be deleted, and only new or updated study events will be processed.
- When transactional mode is not selected, study events not in the most recent file will be deleted as well.
- Deleted study events may cause voids to be created in Void Management.
Automation Options
- The system contains the option of automating the study event preview and study event submission, if the study events fall within a configured tolerance.
- To automate the study event preview and study event submission steps, check the box before saving the new file.
- The best practice is to run the feed without any automation options the first few times after the data feed is created or after any significant changes to the data.
- After a data feed has been run 2-4 times reliably and without incident, then the automation options may be used to reduce the number of touches required.
Automation Parameters
- Automation parameters allow you to set benchmarks to limit the automation options.
- If any step of the data upload process exceeds one of the parameters, the process will stop and require human intervention to proceed.
- This fail-safe allows time for a human to review the changes and either accept them or make changes before irrevocable changes are made to a study.
- All of the automation parameters are measured in percentages and only accept values from 0 to 100.
- In practice, these values should be very low.
- For most mature data feeds that Sitero manages, these limits are set at 3%.
Uploading Data Process
- The process for manually uploading data is relatively simple and may be automated to expedite the process.
- The subsections below provide details about the steps for importing data feeds, submitting study events, and running CML.
Importing Data Feeds
- Log in to the system.
- Select the appropriate study.
- Navigate to Study Event > CML Engine > Feeds.
- Select the appropriate data feed and click the “Edit” icon.
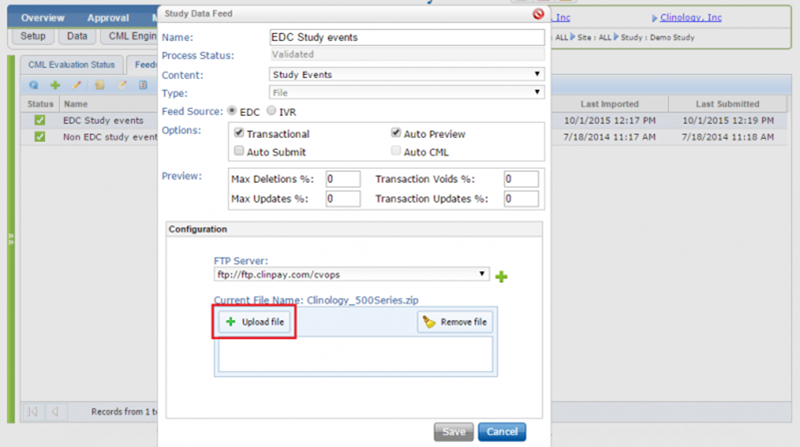
- In the “Study Data Feed” dialog box, click the Upload File button and select the file.
- In the “Open” window, select the file. Note that the file must have an extension of *.csv or *.zip.
- Compression is recommended for files more than 2 MB and may be required for larger files to avoid time out errors.
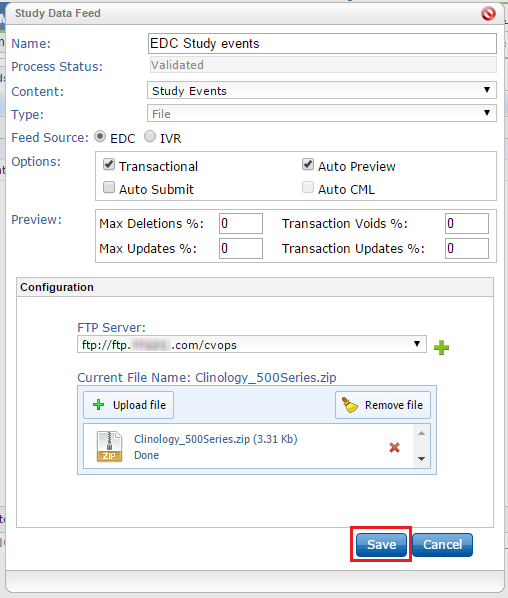
- Once the file has been uploaded, verify the data feed options and automation options.
- Once all settings are set as desired, click the Save button. At any time, you may click the Cancel button to abort the file upload process.
Study Event Submission Process
The following process assumes that none of the automation options have been selected.
If some of the automation options have been selected, some or all of the following steps may be disregarded.
- After a file has been uploaded, the data feed will be marked with a green flag icon to show the “Initialized” status.
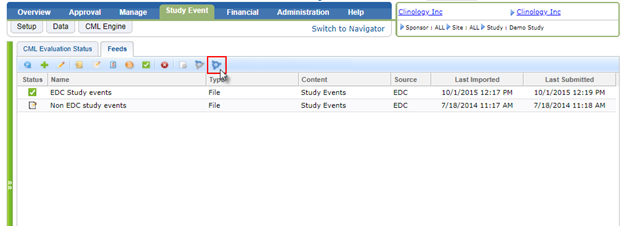
- Select the feed and click the “Import Data Feed Events” (yellow icon, located above the grid).
- When asked to confirm, click “Accept.” The status icon may change to a spinning “Preview” status. Click the blue “refresh” icon to see an updated status.
- Note that for large feeds with tens of thousands of study events, this process may require a few minutes.
- Select the feed and click the “Show Data Feed Preview” button. In the “Study Data Feed Preview” dialog box, select the “Study Data Feed Preview” report and click the “Print” icon.
- In the new window, review the information in the “Data Feed Action” subtotals.
- In general, “Insert” and “Update” records are normal and expected. Deleted study events should be monitored carefully as large spike may indicate a problem with the generation of the file.
- If the numbers look as expected, click the Approve button in the Study Data Feed Preview window.
- In the feeds tab, select the feed and click the Submit Data Feed Events button.
- When asked to confirm, click Accept.
- The feed status should change to the spinning “submitting” status. Click the refresh button to see the status when it’s changed.
- After the study events have been submitted, the status will change to the green “Validated” status.


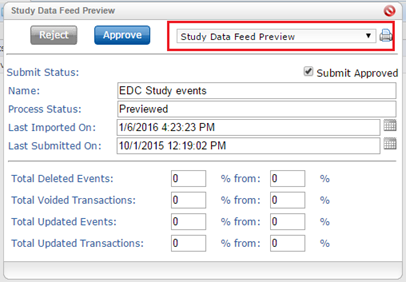
- Carefully review the information that displays in this preview window before clicking the Approve button.
- Click the Reject button to abort this process, return to the previous screen and make changes.
- This action allows you to stop without consequences.
- You may upload a new file or make changes to overwrite the recent upload and run through the process again.
- Click the Submit button; the data is submitted and added to the Study Events.
Running CML
- CML refers to Contract Meta-Language, the technology used to program payment triggers.
- Running CML is the name given to the process of triggering the system to use the payment trigger in published contracts to review the study events and determine what sites and vendors are eligible for payments.
- Contracts may be run individually with the “Run Partial CML Evaluation by Contract.”
- All contracts may be evaluated by selecting the “Run Full CML Evaluation” icon.
- Log in to the system. Select the appropriate study.
- Navigate to Study Event > CML Engine > Feeds.
- Select the “Run Full CML Evaluation” icon.
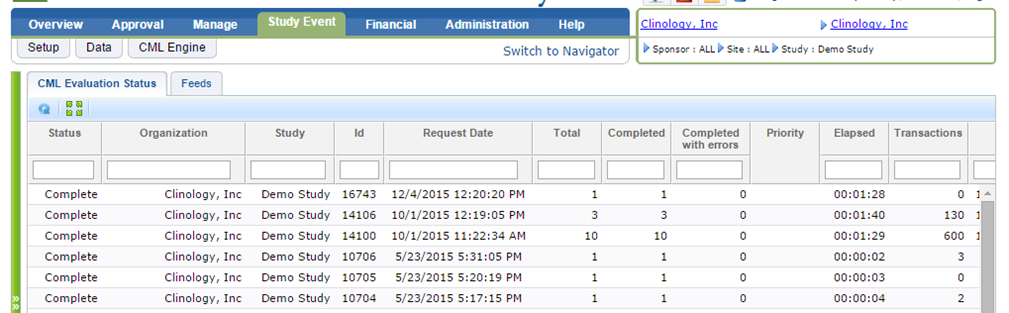
- Select the “CML Evaluation Status.” The newly triggered run should be the first record in the grid.