

Payment Process in Mentor Payments
The diagram below shows an overview of the steps that occur for payment processing (via ClinBank) in the system.
Contact you project manager for information about payments made through an external AP system.

Remember: When your system has access to an AP system, an additional step of self-bill occurs for non-invoiceable transactions between clinical review and open payables.
Clinical Review
Clinical Review displays all transactions where data has satisfied the conditions for contracted line items and are accrued for the payee.
In Clinical Review, transactions can be reviewed for payment details, approved for payment eligibility or put on hold.
After a transaction has been approved from Clinical Review, it will either go to Site Invoice for transactions that require an invoice before they can be paid or to Open Payables if a site does not need to provide an invoice.
Site Invoicing
Site Invoicing holds line items that have met the data requirements for payment but need an invoice before they are paid.
After the site has sent an invoice, the respective transactions are selected to be processed to Open Payables and the invoice number is attached to the transactions.
After processing an invoice, you may receive a prompt (if an external AP system is active in for your study), allowing you to select an external AP system to settle payments.
Open Payables
Open Payables collects approved transactions from Clinical Review and processed invoices from Site Invoices, to be processed into a payment batch.
Create Payment Batch
Payment batches are created from Open Payables.
A payment batch is a set of payable transactions and invoices that are all approved and paid together and can include multiple payees and currencies.
At the time of batch creation, the system sends the batch details to the configured recipients for review of transactions.
Approve Payment Batch
Payment batches must be approved before transactions can be paid.
Once a payment batch has been created, the payment batch approver can review the items in the payment batch.
The approver may remove items at the transaction level or the payee level or reject the batch entirely.
Once a payment batch is approved, the system communicates with its partners to either print physical checks, send the money electronically, or send to an external AP system.
Payments
After the system receives payment settlement information from its partners, the transactions move to a paid status in the system.
An e-mail is automatically sent to the vendor with detailed payment remittance information.
Reconciliation
Reconciliation is the process of making sure all payments between the Sponsor (or CRO) and the Trial Sites are correct, complete, and properly recorded.
This process involves checking and matching payment records (e.g., invoices, contracts) with the actual payments made, to ensure everything adds up and no errors are made.
Remember: Only transactions listed under Open Payables are available for Reconciliation.
Adding Reconciliation Permission
- Reconciliation permission is required to access this feature; this setting is located under the Financial Management section on the Role Management screen.
- To enable this permission, click in the checkbox for the specific role.
- Users assigned to this role will then be able to see the “Create RECON Batch” icon in the Open Payables screen.
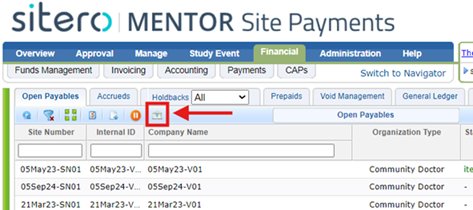
Reconciliation Screen
- Accessing the Screen: Single-click a vendor and then click the “Create RECON Batch” icon to open the reconciliation screen.
- Vendor Selection: If no vendor row is selected, a message displays onscreen.
- Popup Fields:
- Payment Date
- Payment Reference Number
- Payment Type: A dropdown menu; click to open and display options for Check (default) or Electronic.
- Submit Button: Initially disabled, populate required information to activate it.
- Close Dialog Box Icon: Located at the top right of the dialog box for dismissing the screen.
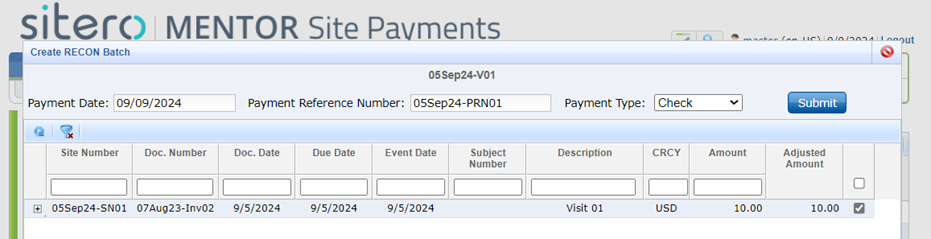
Marking Reconciliation Items as Paid
- Submit Button Activation
- The Submit button becomes actionable when at least one transaction is checked and the Payment Date, Payment Reference Number, and Payment Type are provided.
- Submit Action
- Clicking Submit moves the selected transactions to the Paid tab, removing them from the Open Payables screen. This action also creates a journal entry for each transaction with the following details:
- Document Type: RECON
- Description: Includes “Payment Reconciliation” followed by the term description.
- Journal Details
- For Positive Payment Amounts
- Credit: CSH (CoA Name related to Reconciliation)
- Debit: AP
- For Negative Payment Amounts
- Debit: CSH (CoA Name related to Reconciliation)
- Credit: AP
- Adjusting a Positive Payment Amount Down
- Credit: Cash for the adjusted amount
- Debit: AP for the amount prior to adjustment
- Credit: EXP for the difference
- Adjusting a Positive Payment Amount Up
- Credit: Cash for the adjusted amount
- Debit: AP for the amount prior to adjustment
- Debit: EXP for the difference
- Transaction Sources for Reconciliation
- Transactions added through Site Requests
- CML Evaluation
- Released from HB
- Submitted through Void Management
- MACDM
Adjusting Paid Amounts for Reconciliation
- Editable Field
- On the Create RECON Batch screen, double click in the Adjusted Amount field to make it editable.
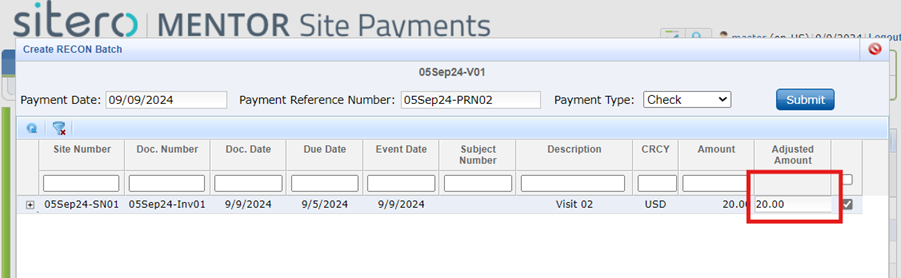
- Field Color Change
- After making an adjustment, the cell color changes to green to indicate that the amount has been altered.
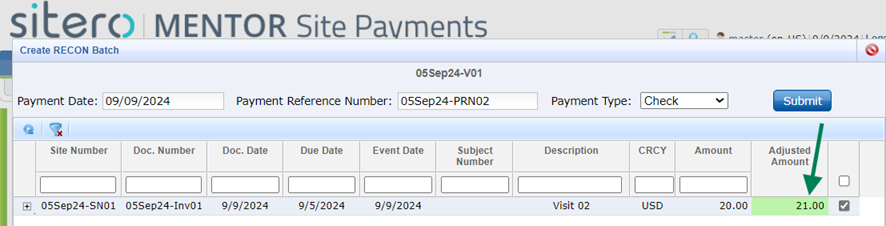
- Error Messages
- Invalid Characters: If users enter special characters other than numbers and periods, the field displays the error message: “Unable to adjust amount. This field only allows monetary input with the format of x.xx.”
- Zero Value: If users attempt to enter 0.00, the error message “Unable to adjust amount. The entered value must be greater than 0.00.” displays.
- Non-Editable Items
- Credit Memos: Manually added credit memos and voids created through void management cannot be edited.
- Debit Memos and Positive Transaction Amounts: Cannot be adjusted to be less than or equal to zero.
- Cancellation Behavior
- Canceling the Create Reconciliation Batch screen after adjustments will save the changes. These changes will be visible when reopening the screen, with the green cell color indicating the adjustments.
Transaction Logs for Reconciliation Payments
- Log Entry
- Transactions settled through reconciliation will display in the Search Transaction Tool with the following message:
- “Transaction marked as paid through reconciliation. Amount: xxx.xx; Currency: xxx; Payment Batch ID: xxxx; Invoice Number: xxxxx; Payment Number: xxxxx.”
To Verify the Reconciliation
- Go to Financial > Payments > Paid Tab.
- Use the Payment Reference Number (from Excel sheet) to filter in the Check/EFT# column.
