

Kiosk – Site Instructions in Mentor EDC
The Sitero Mentor Kiosk is an on-line system that allows study participants to answer questionnaires for the study, and the data that the subject enters is saved within the EDC system.
Questionnaires display as forms within a folder in the system. As a subject completes the questionnaire, you will see the data completed within the relevant questionnaire form in Mentor EDC.
The Kiosk can be accessed from any device that is connected to the internet and has a web browser.
Remember: Setting up the Subject access and Viewing the Questionnaire Schedule is accessed in the Mentor EDC system. When the Freeze Data OR Lock Data option is turned “On” for a Subject, Questionnaires are unavailable for the subject in the Kiosk until the option is turned “Off.”
Setting Up a Subject for the Kiosk
IMPORTANT: Access for the subject MUST be set up in the EDC system prior to configuring the Kiosk information for a subject.
Follow the steps below to setup the subject’s Kiosk access.
- Log in to Mentor EDC.
- Select the Sponsor, Study, and Site.
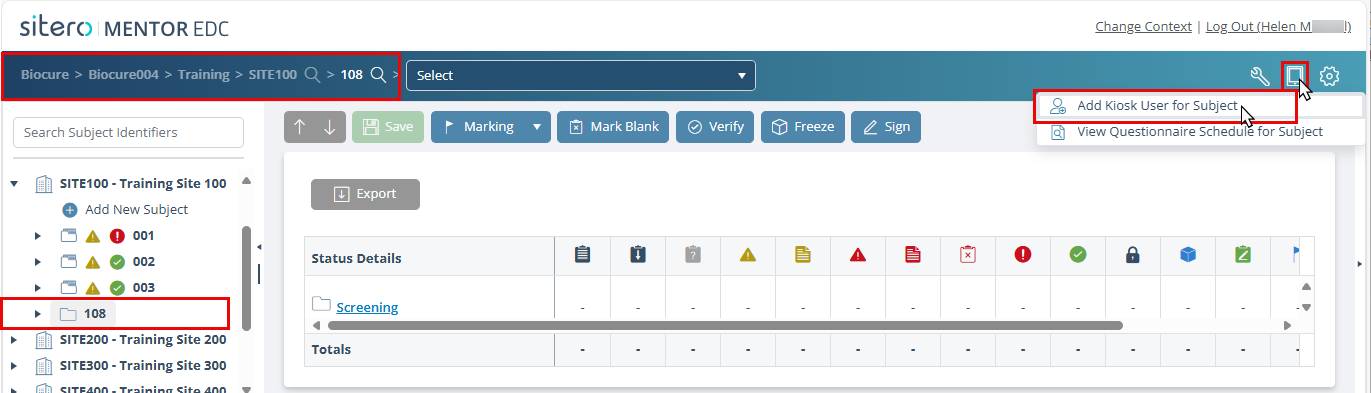
- Click on the Subject folder for the subject to be setup in Kiosk.
- Hover over the Kiosk menu (in toolbar) and click the Add Kiosk User for Subject button.
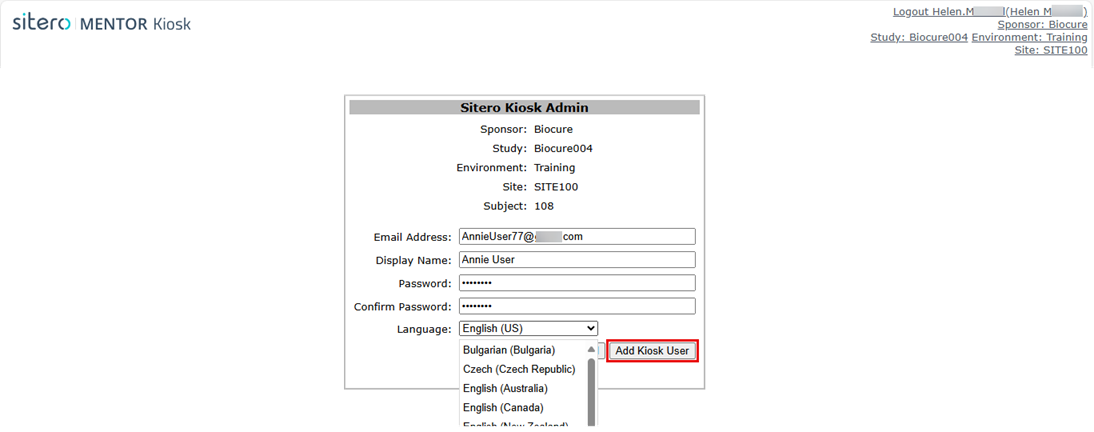
- The EDC Kiosk Admin screen displays in a new browser window.
- Enter a unique e-mail address, a display name, and a general/default password for the subject. If the subject’s email is already in the Kiosk system, the Password and Confirm Password fields are disabled, and display gray color.
- Click the Add Kiosk User button.
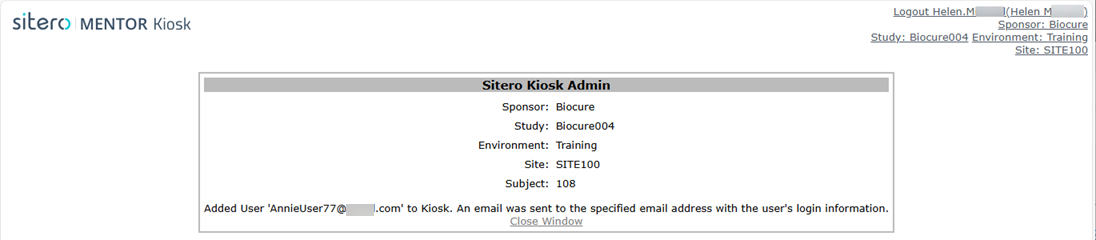
- A screen displays, confirming the subject now has access to the Kiosk.
- After you start a questionnaire for the subject, they are able to see the questionnaire when they log into the Kiosk.
- A grid displays information about the Kiosk User and options to Reset Password, Update Language, and Delete Kiosk User.

| Overview |
|

View Questionnaire Schedule for Subject
After setting up the subject in Kiosk, you can view and manage their Questionnaire schedule AND manually enable or disable questionnaires.
Follow the steps below to view the subject’s questionnaire schedule.
- Log in to Mentor EDC.
- Select the Sponsor, Study, and Site.
- Click on the Subject folder for subject you wish to view.
- Click the View Questionnaire Schedule for Subject menu option under the Kiosk button (in toolbar).


- The Subject Questionnaires Schedule screen displays.

All questionnaires populated in the study tree display with the type of questionnaire (manual, scheduled, etc.), their status, start and end dates, plus enable and disable check boxes.
- For Scheduled Questionnaires:
- The Start Date indicates when the questionnaire will be enabled and available to the subject.
- The End Date indicates when the questionnaire will be disabled and unavailable to the subject.
Manually Enable/Disable a Scheduled Questionnaire
Manually enabling a Scheduled questionnaire could potentially make the Scheduled questionnaire available outside of the intended window.
Unless this is the intent, Enable should NOT be checked for Scheduled questionnaires.
The questionnaire will automatically enable for the subject based on the programmed dates.
- To enable a questionnaire for a subject manually, click on the check box next to that questionnaire under the Enable column. The questionnaire is now available for the subject within the Kiosk.
Manually disabling a Scheduled questionnaire could inhibit the system from automatically enabling the questionnaire according to the programmed dates or shorten the intended window of availability, if performed during the programmed time frame.
Unless this is the intent, Disable should not be checked for Scheduled questionnaires.
The questionnaire will automatically disable based on the programmed dates.
- To manually disable a questionnaire for a subject, perform one (1) of the options below and the questionnaire will no longer be available for the subject within the Kiosk.
- Click on a check mark (uncheck the box) for the completed questionnaire in the Enable column.
- Click on the check box next to that questionnaire under the Disabled column.
– OR –
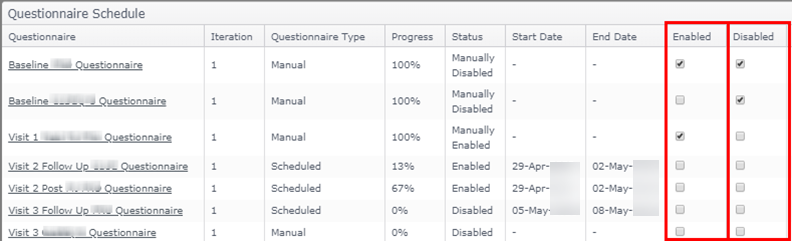
Remember: In the example above, if today’s date is Apr 29, both Visit 2 questionnaires have been programmatically enabled based on their Relative date and will disable at 11:59 pm on the End Date. The Visit 3 Follow Up questionnaire is scheduled to be enabled in the time frame shown.
